그동안 Terraform을 주로 AWS에서 사용했는데 이번에 Kubernetes 스터디를 하면서 Kubernetes Engine을 사용해 보려고 하고 있다. 설치해서 운영하는 것도 궁금하기는 하지만 일단 Kubernetes Engine로 클러스터 운영을 보려고 하는데 요즘은 모든 클라우드를 Terraform으로 설정하기 때문에 Kubernetes Engine을 만들기 전에 Google Cloud Platform을 Terraform으로 관리하기 위한 설정이 필요했다.
Terraform으로 클라우드를 관리하려면 사실 클라우드에 대한 이해도가 높아야 한다. 다시 말하면 Terraform은 Infrastructure as Code로 관리되지 않던 인프라를 관리해 주지만 내부를 몰라도 되도록 추상화해주지는 않는다. 사실 웹 관리 콘솔을 사용하는 것보다 내부를 훨씬 더 잘 이해해야 한다. 하지만 Google Cloud Platform(GCP)에서 간단한 Google API 정도만 이용해 봤지 인프라를 이용해 본 적은 없다. 그래서 GCP의 개념 등은 잘 모른다. 그래서 이글에서 설명하는 내용도 Terraform 설정 방식에 관한 부분이고 GCP 자체에 대한 설명은 부족한 편이다.
Google Cloud Platform 프로바이더 설정
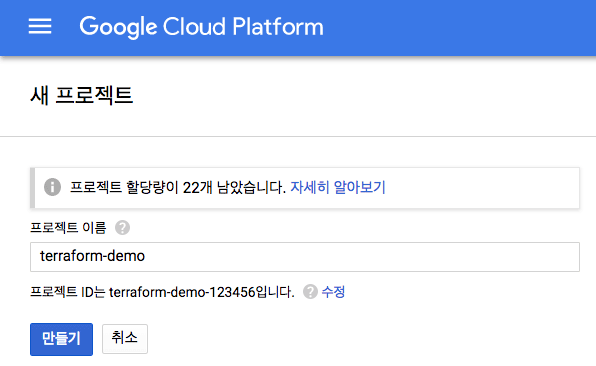
Google Cloud Console에서 먼저 프로젝트를 생성해야 한다. 물론 이미 있는 프로젝트를 사용해도 된다. GCP에 대해서 다 이해 못했지만 AWS와는 달리 모든 리소스가 프로젝트 하위에 포함되는 것으로 보인다. API를 사용할 때는 어색하지 않았는데 인프라를 생성할 때는 어색하게 느껴졌다.

여기서는 terraform-demo라는 이름으로 프로젝트를 만들었다. 이 프로젝트를 Terraform으로 사용하기 위해 인증 정보를 생성해야 한다.

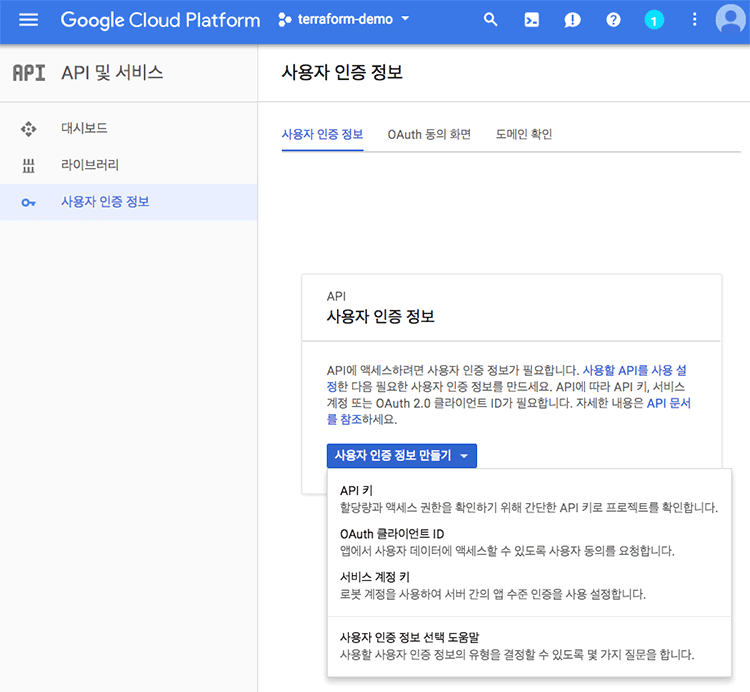
[API 및 서비스] - [사용자 인증 정보]에서 "서비스 계정 키"로 새로운 사용자 인증 정보를 만든다.

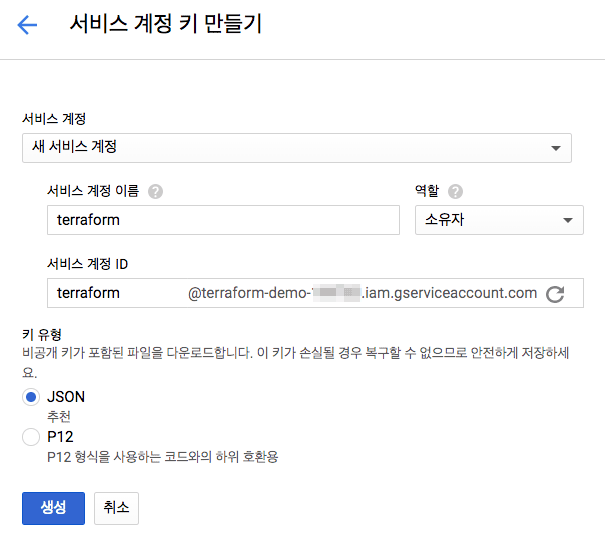
"새 서비스 계정"에서 이름을 입력하고 역할을 프로젝트 "소유자"로 지정했다. 이 역할에 대해서는 아직 완전히 이해는 못했는데(뒤에서 어차피 또 API 권한 설정을 해야 한다.) Terraform 같은 경우 해당 클라우드 프로바이더의 거의 모든 것을 제어할 수 있어야 하므로 모든 권한을 가질 수 있는 "소유자" 지정했다. 키 유형을 JSON으로 지정하고 생성하면 terraform-demo-f36db3369c3a.json 같은 파일이 다운로드 되는데 이 파일이 인증키이고 다음과 같이 생겼다.
{
  "type": "service_account",
  "project_id": "terraform-demo-123456",
  "private_key_id": "asdf123456",
  "private_key": "-----BEGIN PRIVATE KEY-----\nXXXXX\n-----END PRIVATE KEY-----\n",
  "client_email": "terraform@terraform-demo-123456.iam.gserviceaccount.com",
  "client_id": "111222333444",
  "auth_uri": "https://accounts.google.com/o/oauth2/auth",
  "token_uri": "https://accounts.google.com/o/oauth2/token",
  "auth_provider_x509_cert_url": "https://www.googleapis.com/oauth2/v1/certs",
  "client_x509_cert_url": "https://www.googleapis.com/robot/v1/metadata/x509/terraform%40terraform-demo-123456.iam.gserviceaccount.com"
}
이 인증키를 Terraform을 사용하는 폴더로 이동하고 다음과 같은 providers.tf를 생성한다.
provider "google" {
  version     = "~> 1.8"
  credentials = "${file("terraform-demo-f36db3369c3a.json")}"
  project     = "terraform-demo-123456"
  region      = "asia-northeast1"
}
이는 Terraform의 Google Cloud Provider 설정이다. versions은 terraform-provider-google의 버전을 지정한 것이다. 꼭 필수는 아닌데 하위 프로바이더와 동작하지 않도록 보통은 지정하는 편이다. credentials은 앞에서 다운로드받은 인증키 파일의 위치를 지정해 준 것이다. project와 region은 꼭 지정하지 않아도 되는데 Terrafom으로 계속 관리하다 보니까 문제가 생기는 경우가 있어서 문서에 나온 대로 그냥 지정했다. project는 인증키 파일에도 있는데 굳이 또 지정해야 하는 이유는 모르겠고 리전 정보는 GCP 문서에서 찾을 수 있다.
$ terraform init

Initializing provider plugins...
- Checking for available provider plugins on https://releases.hashicorp.com...
- Downloading plugin for provider "google" (1.8.0)...

Terraform has been successfully initialized!

You may now begin working with Terraform. Try running "terraform plan" to see
any changes that are required for your infrastructure. All Terraform commands
should now work.

If you ever set or change modules or backend configuration for Terraform,
rerun this command to reinitialize your working directory. If you forget, other
commands will detect it and remind you to do so if necessary.
Terraform을 초기화하고 프로바이더 플러그인을 가져왔다.
$ terraform plan
Refreshing Terraform state in-memory prior to plan...
The refreshed state will be used to calculate this plan, but will not be
persisted to local or remote state storage.

------------------------------------------------------------------------

No changes. Infrastructure is up-to-date.

This means that Terraform did not detect any differences between your
configuration and real physical resources that exist. As a result, no
actions need to be performed.
plan을 실행해보면 정상적으로 실행되는 것을 알 수 있다.
Terraform Remote Backend 설정
Terraform의 상태 파일인 .tfstate 파일은 로컬보다는 원격에서 관리해야 하므로 GCP에서도 마찬가지로 Google Cloud Storage(GCS)를 리모트 백엔드로 설정해서 tfstate를 관리하기 위해 GCS 설정부터 해야한다.
gcs.tf라는 파일을 만들어 보자.
resource "google_storage_bucket" "terraform_state" {
  name     = "outsider-terraform-demo-state"
  location = "asia-northeast1"

  versioning = {
    enabled = "true"
  }
}
GCS에서 버킷을 생성하는 설정이다. 여기서 이름은 S3처럼 전 사용자가 공통으로 쓰는지 일반적인 이름은 사용 중이라고 충돌 나므로 접두사를 붙여주는 게 좋다. tfstate를 관리할 것이므로 vserioning도 활성화 했다. terraform plan을 실행하면 정상적으로 나오지만, 막상 apply를 하려고 하면 다음과 같이 권한 오류가 발생한다.
* google_storage_bucket.terraform_state: googleapi: Error 403: Access Not Configured. Compute Engine API has not been used in project 12345678 before or it is disabled. Enable it by visiting https://console.developers.google.com/apis/api/compute.googleapis.com/overview?project=12345678 then retry. If you enabled this API recently, wait a few minutes for the action to propagate to our systems and retry., accessNotConfigured
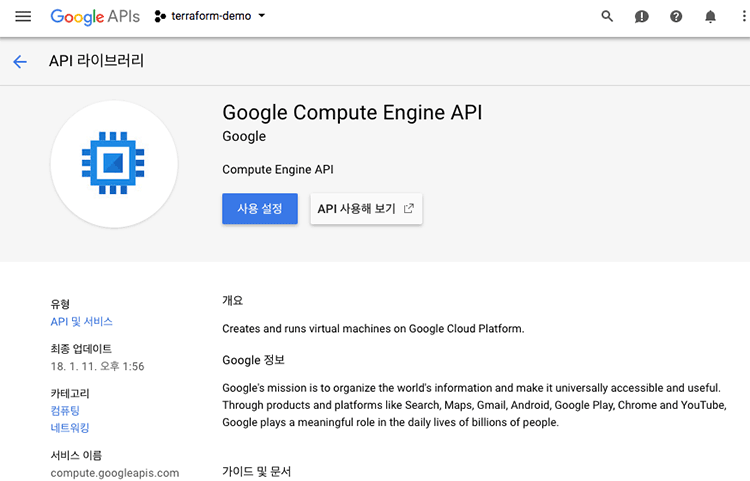
저 URL에 나온 대로 API 사용 권한을 주어야 한다. 여기서는 "Google Compute Engine API"를 사용으로 설정해야 한다.

이제 다시 적용하면 정상적으로 GCS에 버킷이 생성된다.
$ terraform apply

google_storage_bucket.terraform_state: Creating...
  force_destroy:        "" => "false"
  location:             "" => "ASIA-NORTHEAST1"
  name:                 "" => "outsider-terraform-demo-state"
  project:              "" => "<computed>"
  self_link:            "" => "<computed>"
  storage_class:        "" => "STANDARD"
  url:                  "" => "<computed>"
  versioning.#:         "" => "1"
  versioning.0.enabled: "" => "true"
google_storage_bucket.terraform_state: Creation complete after 5s (ID: outsider-terraform-demo-state)

Apply complete! Resources: 1 added, 0 changed, 0 destroyed.

리소스가 잘 생성되었으므로 이 내용을 기록하고 있는 terraform.tfstate 파일이 로컬에 생성된다. 이 파일을 이제 여기서 만든 GCS에서 관리하도록 올려야 한다. terraform.tf파일을 다음의 내용으로 작성한다.
terraform {
  required_version = ">= 0.11.5"

  backend "gcs" {
    bucket = "outsider-terraform-demo-state"
    prefix = "terraform-demo"
    region = "asia-northeast1"
  }
}
여기서 bucket은 앞에서 만든 GCS의 버킷이고 여러 tfstate를 관리하게 될 가능성이 크므로 prefix를 붙였다. 리모트 백엔드를 추가하면 다시 terraform init을 해야 한다.
$ terraform init

Initializing the backend...

Error configuring the backend "gcs": storage.NewClient() failed: dialing: google: could not find default credentials. See https://developers.google.com/accounts/docs/application-default-credentials for more information.

Please update the configuration in your Terraform files to fix this error
then run this command again.
하지만 이를 실행하면 위처럼 오류가 발생한다. 오류의 내용을 보면 기본 인증을 찾을 수 없다고 나오는데 문서를 보면 Application Default Credentials(ADC)라고 GCP 클라이언트가 사용하는 기본 인증정보로 보인다. 이를 설정하는 GOOGLE_APPLICATION_CREDENTIALS 환경변수에 관해 Terraform 문서에도 나와 있어서 이를 바탕으로 GOOGLE_APPLICATION_CREDENTIALS 환경변수를 설정했다. 이 값은 앞의 providers.tf에서 설정한 JSON 파일과 같다.
$ export GOOGLE_APPLICATION_CREDENTIALS=terraform-demo-f36db3369c3a.json
이제 다시 terraform init를 실행해보자.
$ terraform init

Initializing the backend...
Acquiring state lock. This may take a few moments...
Do you want to copy existing state to the new backend?
  Pre-existing state was found while migrating the previous "local" backend to the
  newly configured "gcs" backend. An existing non-empty state already exists in
  the new backend. The two states have been saved to temporary files that will be
  removed after responding to this query.

  Previous (type "local"): /var/folders/k8/j1j0fjkn5_vdzxybfqq0r7lc0000gn/T/terraform300035322/1-local.tfstate
  New      (type "gcs"): /var/folders/k8/j1j0fjkn5_vdzxybfqq0r7lc0000gn/T/terraform300035322/2-gcs.tfstate

  Do you want to overwrite the state in the new backend with the previous state?
  Enter "yes" to copy and "no" to start with the existing state in the newly
  configured "gcs" backend.

  Enter a value: yes


Successfully configured the backend "gcs"! Terraform will automatically
use this backend unless the backend configuration changes.

Initializing provider plugins...

Terraform has been successfully initialized!

You may now begin working with Terraform. Try running "terraform plan" to see
any changes that are required for your infrastructure. All Terraform commands
should now work.

If you ever set or change modules or backend configuration for Terraform,
rerun this command to reinitialize your working directory. If you forget, other
commands will detect it and remind you to do so if necessary.
정상적으로 실행되면서 로컬에 있는 tfstate를 GCS에 업로드할 것인지를 묻고 yes를 입력하면 GCS를 리모트 백엔드로 사용하도록 설정한다. 이제 로컬에서는 tfstate를 지워도 되고 테스트를 해보면 Lock도 제대로 동작하는 것을 알 수 있다.

GCS에 들어가 보면 default.tfstate라는 파일로 올라간 것을 확인할 수 있다.


Comments