

AWS만 사용해 보다가 GCP(Google Cloud Platform)를 써보기 시작한 게 사실은 Kubernetes를 테스트해보기 위함이다. GCP에서는 구글이 완전히 관리해주는 GKE(Google Kubernetes Engine)를 제공하고 있어서 따로 Kubernetes를 설치하고 관리할 필요 없이 사용할 수 있다. Kubernetes는 이제 막 배우는 단계이지만 인프라를 거의 Terraform으로 관리하고 있어서 GKE 설정도 Terraform을 이용했다. GCP에 대한 기본 설정은 Google Cloud Platform에 Terraform 설정하기를 참고하면 된다.
GKE 클러스터 생성
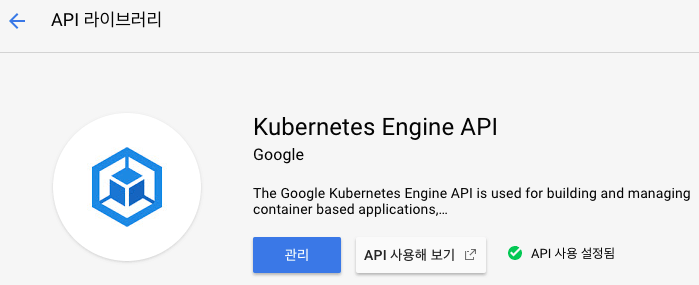
GKE를 사용하려면 사용할 프로젝트에서 API를 활성화 해야 한다. "API 및 서비스"에서 Compute Engine API, Kubernetes Engine API를 찾아가서 사용 설정을 한다.
GKE를 만들려면 google_container_cluster 리소스를 사용하면 된다.
resource "google_container_cluster" "practice" {
  name               = "practice"
  zone               = "${data.google_compute_zones.available.names[0]}"
  initial_node_count = 2

  node_version       = "1.10"
  min_master_version = "1.10"

  additional_zones = [
    "${data.google_compute_zones.available.names[1]}",
  ]

  master_auth {
    username = "${var.username}"
    password = "${var.password}"
  }

  node_config {
    oauth_scopes = [
      "https://www.googleapis.com/auth/compute",
      "https://www.googleapis.com/auth/devstorage.read_only",
      "https://www.googleapis.com/auth/logging.write",
      "https://www.googleapis.com/auth/monitoring",
    ]
  }
}
Terraform 문서를 참고한 기본 설정이다. 클러스터 인스턴스를 실행할 zone과 additional_zones는 리전에서 사용할 수 있는 available zone을 가져오도록 했다. 이 이름을 하드 코딩하지 않으려고 variables.tf파일에서 다음과 같이 data 설정을 추가했다.
data "google_compute_zones" "available" {}
여기서 가져온 availabe zone 배열에서 첫 번째 존을 기본 존으로 설정하고 additional_zones에 다른 존을 추가했다. additional_zones에는 여러 값을 넣어도 되지만 연습이므로 하나만 추가했다. initial_node_count는 클러스터의 노드 개수다. 이 숫자에는 마스터 노드는 포함되지 않는다.(아직 다 파악 못했지만 마스터 노드는 GKE가 따로 관리해 주는 것으로 보인다. 인스턴스 목록에도 나오지 않는다) 그래서 initial_node_count를 2로 설정하면 존마다 2개씩 생성되므로 여기서는 존을 총 2개 설정했으므로 노드는 4개가 실행된다.
node_version과 min_master_version은 노드와 마스터의 Kubernetes 버전이다. GEK의 버전은 문서에서 참고할 수 있는데 1.X, 1.X.Y, 1.X.Y-.*, latest처럼 정의할 수 있고 이후에는 별도로 업데이트 가능한 것 같지만 처음 생성할 때는 node_version과 min_master_version의 버전이 같아야 한다.
master_auth는 마스터에 접근할 인증 정보이다. 여기에 하드 코딩하면 아이디와 비밀번호가 노출되므로 환경변수로 처리하려고 변수로 분리했다. variables.tf에 변수를 추가한다.
variable "username" {}
variable "password" {}
그리고 환경변수로 TF_VAR_username와 TF_VAR_password를 지정하면 Terraform을 사용할 때 이 환경변수의 값이 이 변수에 자동으로 할당되어서 Terraform 설정 파일에서는 이 값을 노출하지 않을 수 있다.
node_config는 아직 자세히 몰라서 Terraform 문서에 나온 대로 설정했다.
$ terraform apply
data.google_compute_zones.available: Refreshing state...

An execution plan has been generated and is shown below.
Resource actions are indicated with the following symbols:
  + create

Terraform will perform the following actions:

  + google_container_cluster.practice
      id:                                    <computed>
      additional_zones.#:                    "1"
      additional_zones.2275771321:           "asia-northeast1-b"
      addons_config.#:                       <computed>
      cluster_ipv4_cidr:                     <computed>
      enable_kubernetes_alpha:               "false"
      enable_legacy_abac:                    "false"
      endpoint:                              <computed>
      initial_node_count:                    "2"
      instance_group_urls.#:                 <computed>
      logging_service:                       <computed>
      master_auth.#:                         "1"
      master_auth.0.client_certificate:      <computed>
      master_auth.0.client_key:              <computed>
      master_auth.0.cluster_ca_certificate:  <computed>
      master_auth.0.password:                <sensitive>
      master_auth.0.username:                "outsider"
      master_version:                        <computed>
      min_master_version:                    "1.10"
      monitoring_service:                    <computed>
      name:                                  "practice"
      network:                               "default"
      network_policy.#:                      <computed>
      node_config.#:                         "1"
      node_config.0.disk_size_gb:            <computed>
      node_config.0.guest_accelerator.#:     <computed>
      node_config.0.image_type:              <computed>
      node_config.0.local_ssd_count:         <computed>
      node_config.0.machine_type:            <computed>
      node_config.0.oauth_scopes.#:          "4"
      node_config.0.oauth_scopes.1277378754: "https://www.googleapis.com/auth/monitoring"
      node_config.0.oauth_scopes.1632638332: "https://www.googleapis.com/auth/devstorage.read_only"
      node_config.0.oauth_scopes.172152165:  "https://www.googleapis.com/auth/logging.write"
      node_config.0.oauth_scopes.299962681:  "https://www.googleapis.com/auth/compute"
      node_config.0.preemptible:             "false"
      node_config.0.service_account:         <computed>
      node_pool.#:                           <computed>
      node_version:                          "1.10"
      private_cluster:                       "false"
      project:                               <computed>
      region:                                <computed>
      zone:                                  "asia-northeast1-a"


Plan: 1 to add, 0 to change, 0 to destroy.
이를 실행하면 GKE 클러스터가 생성된다.

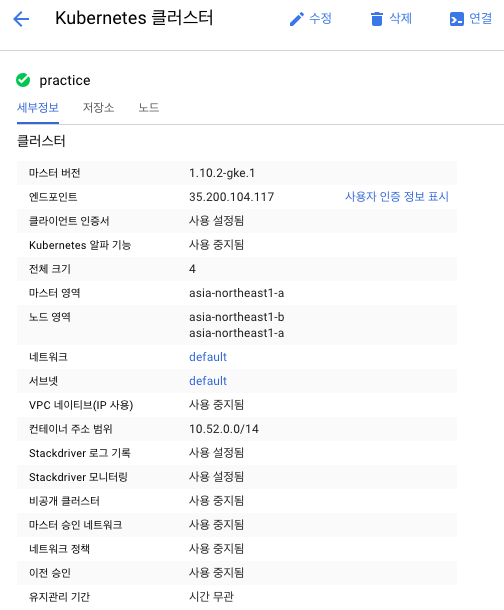
클러스터를 만들었으니 제대로 동작하는지 사용해보자.
클러스터 정보를 가져오려면 Google Cloud Shell을 먼저 설치해야 한다. gcloud init으로 로그인한 뒤 클러스터 정보를 가져오기 위해 설정한다.
$ gcloud config set core/project kubernetes-practice-204905
Updated property [core/project].

$ gcloud config set compute/zone asia-northeast1-a
Updated property [compute/zone].

$ gcloud config set container/cluster practice
Updated property [container/cluster].
설정한 정보는 gcloud config list로 확인할 수 있다.
$ gcloud config list
[compute]
region = asia-northeast1
zone = asia-northeast1-a
[container]
cluster = practice
[core]
account = YOUR_EMAIL
disable_usage_reporting = True
project = kubernetes-practice-204905

Your active configuration is: [default]
프로젝트와 생성한 GKE 클러스터 설정을 했으니 클러스터 인증 정보를 gcloud container clusters get-credentials PROJECT_NAME으로 가져올 수 있다.
$ gcloud container clusters get-credentials practice
Fetching cluster endpoint and auth data.
kubeconfig entry generated for practice.
성공적으로 실행되면 Kubenetes에서 사용할 수 있도록 ~/.kube/config에 클러스터 정보가 업데이트된다.
$ kubectl config get-contexts
CURRENT   NAME                                                        CLUSTER                                                     AUTHINFO                                                    NAMESPACE
          docker-for-desktop                                          docker-for-desktop-cluster                                  docker-for-desktop
*         gke_kubernetes-practice-204905_asia-northeast1-a_practice   gke_kubernetes-practice-204905_asia-northeast1-a_practice   gke_kubernetes-practice-204905_asia-northeast1-a_practice
gke_kubernetes-practice-204905_asia-northeast1-a_practice가 추가된 것을 볼 수 있고 현재 컨텍스트로 설정되어 있지 않다면 kubectl config use-context gke_kubernetes-practice-204905_asia-northeast1-a_practice로 변경할 수 있다.
클러스터가 정보를 가져와 보자.
$ kubectl cluster-info
Kubernetes master is running at https://35.200.104.117
GLBCDefaultBackend is running at https://35.200.104.117/api/v1/namespaces/kube-system/services/default-http-backend:http/proxy
Heapster is running at https://35.200.104.117/api/v1/namespaces/kube-system/services/heapster/proxy
KubeDNS is running at https://35.200.104.117/api/v1/namespaces/kube-system/services/kube-dns:dns/proxy
Metrics-server is running at https://35.200.104.117/api/v1/namespaces/kube-system/services/https:metrics-server:/proxy

To further debug and diagnose cluster problems, use 'kubectl cluster-info dump'.
kubectl로 GKE 클러스터에 접속하는 것을 확인할 수 있다. 클러스터 사용에 관해서는 다음에...

Comments