

HashiCorp Waypoint로 Kubernetes 클러스터에 배포하기
지난번에 Waypoint를 살펴봤다. 당시에 Waypoint의 동작을 알아보려고 로컬 Docker에서 설치하면서 살펴봤는데 좀 더 실사용에 가까운 Kubernetes 클러스터에 설치해 보자. 이전 글에서 설명한 내용을 다시 설명하지 않으니 이전 글을 먼저 읽어보길 바란다.
이 글을 쓰는 시점의 Waypoint의 버전은 0.2.4이다.
1$ waypoint version
2Waypoint v0.2.4 (ea652a2f)
Waypoint 아키텍처
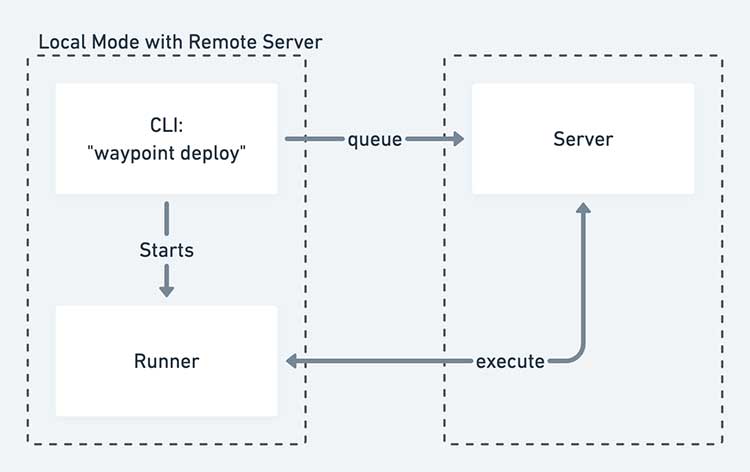
간단히 지난번엔 보지 않았던 아키텍처를 살펴보자.
 출처: Waypoint 아키텍처
Waypoint는 CLI를 통해서 플랫폼에 설치에 놓은 서버에 명령을 보내는 구조로 되어 있다. 그리고 배포할 때마다 자동으로 Entrypoint라는 바이너리를 배포에 끼워 넣게 되고 이 Entrypoint가 서버와 통신해서 명령을 수행하거나 로그를 출력할 수 있게 하거나 배포에 접근할 수 있게 한다.
 출처:
출처: 여러 가지 방식으로 구성할 수 있지만 가장 일반적인 형태는 위와 같은 방식이다. CLI, 서버,
러너가 있는데 러너를 별도로 구성하지 않으면 CLI가 러너의 역할을 한다. 여기서 러너는 명령을 실행하고 로그를 스트리밍하는 등의 역할을 한다.
Kubernetes 클러스터에 Waypoint 서버 설치
Kubernetes 클러스터에 사용할 네임스페이스 waypoint-demo를 새로 만들었다.
1$ kubectl waypoint-demo get all
2No resources found in waypoint-demo namespace.
waypoint install로 서버를 설치하는데 --platform=kubernetes로 플랫폼을 지정했다. 생성한 네임스페이스가 기본 네임스페이스면 필요 없지만 그렇지 않다면 -k8s-namespace=waypoint-demo로 사용할 네임스페이스를 지정해준다.
 1$ waypoint install --platform=kubernetes -accept-tos -k8s-namespace=waypoint-demo
 2✓ Creating Kubernetes resources...
 3✓ Kubernetes StatefulSet reporting ready
 4✓ Waiting for Kubernetes service to become ready..
 5✓ Configuring server...
 6Waypoint server successfully installed and configured!
 7
 8The CLI has been configured to connect to the server automatically. This
 9connection information is saved in the CLI context named "install-1616160032".
10Use the "waypoint context" CLI to manage CLI contexts.
11
12The server has been configured to advertise the following address for
13entrypoint communications. This must be a reachable address for all your
14deployments. If this is incorrect, manually set it using the CLI command
15"waypoint server config-set".
16
17To launch and authenticate into the Web UI, run:
18waypoint ui -authenticate
19
20Advertise Address:
21afa0cfd01f8b048eca783d7e2a9b043d-576521642.ap-northeast-2.elb.amazonaws.com:9701
22Web UI Address:
23https://afa0cfd01f8b048eca783d7e2a9b043d-576521642.ap-northeast-2.elb.amazonaws.com:9702
약간 기다리면 서버 설치가 완료되고 안내 메시지가 나온다. AWS의 EKS에 띄워 놓은 클러스터이므로 ELB가 생성되는데 여기서 출력된 주소가 이용되기까지 약간의 시간이 걸릴 수 있다.
클러스터를 확인하면 다음과 같은 리소스가 생성된 것을 볼 수 있다.
1$ kubectl -n waypoint-demo get all
2NAME                    READY   STATUS    RESTARTS   AGE
3pod/waypoint-server-0   1/1     Running   0          9m38s
4
5NAME               TYPE           CLUSTER-IP       EXTERNAL-IP                                                                   PORT(S)                         AGE
6service/waypoint   LoadBalancer   172.20.195.170   afa0cfd01f8b048eca783d7e2a9b043d-576521642.ap-northeast-2.elb.amazonaws.com   9701:31475/TCP,9702:32395/TCP   9m38s
7
8NAME                               READY   AGE
9statefulset.apps/waypoint-server   1/1     9m38s
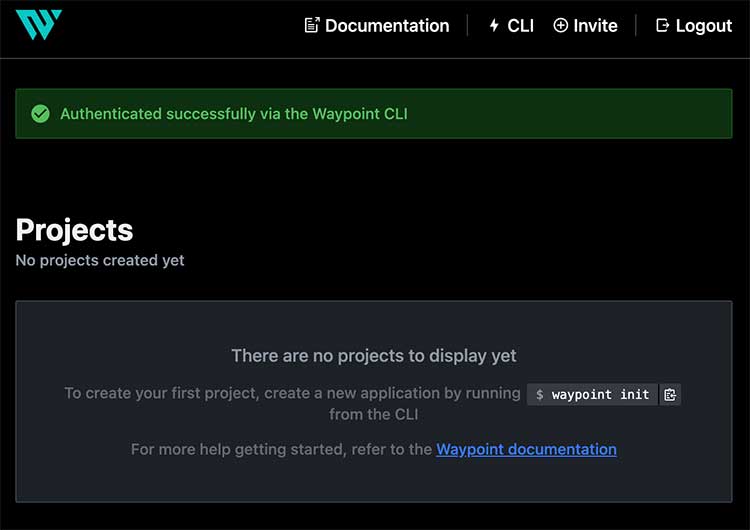
출력된 주소로 접근해도 되지만 waypoint ui -authenticate를 실행하면 따로 토큰을 따로 입력하는 과정 없이 바로 인증되면서 웹 UI에 접속할 수 있다.
1$ waypoint ui -authenticate
2
3» Creating invite token
4This invite token will be exchanged for an authentication
5token that your browser stores.
6
7» Opening browser
이 접속 정보는 context로 관리되고 있는데 여러 Waypoint 서버를 사용하는 경우 waypoint context 명령어로 관리할 수 있다.
1$ waypoint context list
2    |        NAME        |  PLATFORM  |                                  SERVER ADDRESS
3----+--------------------+------------+-----------------------------------------------------------------------------------
4  * | install-1616160032 | kubernetes | afa0cfd01f8b048eca783d7e2a9b043d-576521642.ap-northeast-2.elb.amazonaws.com:9701
예제 애플리케이션 배포
배포는 Docker에 배포하는 것과 다를 것 없지만 플러그인 사용은 약간 다르므로 예제 프로젝트를 배포해 보자.
Waypoint의 공식 예제 프로젝트를 클론 받는다.
1$ git clone git@github.com:hashicorp/waypoint-examples.git
2
3$ cd waypoint-examples/kubernetes/nodejs
예제 프로젝트의 waypoint.hcl 파일이 Docker Desktop 기준이므로 Kuberentes에 맞게 약간 수정한다.
 1project = "example-nodejs"
 2
 3app "example-nodejs" {
 4  labels = {
 5    "service" = "example-nodejs",
 6    "env"     = "dev"
 7  }
 8
 9  build {
10    use "pack" {}
11    registry {
12      use "aws-ecr" {
13        region     = "ap-northeast-2"
14        repository = "waypoint-example-nodejs"
15        tag        = "latest"
16      }
17    }
18  }
19
20  deploy {
21    use "kubernetes" {
22      probe_path = "/"
23    }
24  }
25
26  release {
27    use "kubernetes" {
28      load_balancer = true
29      port          = 80
30    }
31  }
32}
크게 달라진 부분은 없고 build 부분에서 AWS ECR을 사용하도록 아래와 같이 수정했다. 레파지토리 등은 Waypoint가 알아서 만들어 주는데 이 의미는 CLI를 사용하는 곳에서 AWS의 엑세스 키와 시크릿이 등록되어 있어서 권한이 있어야 한다는 의미이다. Kubernetes에서 컨테이너 이미지를 받아와야 하므로 컨테이너 레지스트리가 필요한데 여기서는 ECR을 사용한 것이다.
1registry {
2  use "aws-ecr" {
3    region     = "ap-northeast-2"
4    repository = "waypoint-example-nodejs"
5    tag        = "latest"
6  }
7}
그리고 release 부분에서 로드 밸런서와 포트를 설정했다.
1release {
2  use "kubernetes" {
3    load_balancer = true
4    port          = 80
5  }
6}
설정했으므로 프로젝트를 초기화한다.
 1$ waypoint init
 2✓ Configuration file appears valid
 3✓ Connection to Waypoint server was successful
 4✓ Project "example-nodejs" and all apps are registered with the server.
 5✓ Plugins loaded and configured successfully
 6
 7Project initialized!
 8
 9You may now call 'waypoint up' to deploy your project or
10commands such as 'waypoint build' to perform steps individually.
이제 waypoint up으로 배포를 하자.
 1$ waypoint up
 2
 3» Building...
 4Creating new buildpack-based image using builder: heroku/buildpacks:18
 5✓ Creating pack client
 6✓ Building image
 7✓ Injecting entrypoint binary to image
 8
 9Generated new Docker image: example-nodejs:latest
10✓ All services available.
11✓ Set ECR Repository name to 'waypoint-example-nodejs'
12✓ Tagging Docker image: example-nodejs:latest =>
13252807701206.dkr.ecr.ap-northeast-2.amazonaws.com/waypoint-example-nodejs:latest
14✓ Pushing image...
15Docker image pushed:
16252807701206.dkr.ecr.ap-northeast-2.amazonaws.com/waypoint-example-nodejs:latest
17
18» Deploying...
19✓ Kubernetes client connected to
20https://6FD07520193796D384D5FE2F12FDFD15.yl4.ap-northeast-2.eks.amazonaws.com with namespace
21waypoint-demo
22✓ Creating deployment...
23✓ Deployment successfully rolled out!
24
25» Releasing...
26✓ Kubernetes client connected to
27https://6FD07520193796D384D5FE2F12FDFD15.yl4.ap-northeast-2.eks.amazonaws.com with namespace
28waypoint-demo
29✓ Creating service...
30✓ Service is ready!
31
32The deploy was successful! A Waypoint deployment URL is shown below. This
33can be used internally to check your deployment and is not meant for external
34traffic. You can manage this hostname using "waypoint hostname."
35
36   Release URL:
37http://a408f1fd716154776ba0d765614dccfb-1052952958.ap-northeast-2.elb.amazonaws.com
38Deployment URL: https://smoothly-included-grouper--v1.waypoint.run
위 로그를 보면 Docker 이미지를 만들고 ECR에 푸시한 뒤에 Kubernetes에 배포하고 배포된 앱에 트래픽을 연결한다.
참고로 예제 프로젝트에는 Dockerfile도 없다. 이 부분은 정확히는 Waypoint가 해준다기보다는 build { use "pack" {} }로 지정한 부분에서 Heroku가 CNCF에 기증한 것으로 보이는 Buildpakcs가 자동으로 탐지해서 이미지로 만들어 준 것이다.
릴리스 된 URL에 접속하면 Docker에서 배포할 때와 다를 것 없이 잘 배포된 것을 알 수 있고 이렇게 플랫폼이 달라져서 개발자 입장에서는 사용자 경험이 거의 달라지지 않는 부분이 Waypoint의 장점이라고 생각한다.
Waypoint 서버 삭제
연습이 끝났으면 설치한 Waypoint 서버를 삭제한다. 여기서 주의할 점은 설치할 때 waypoint install을 사용한 것과 달리 삭제할 때는 waypoint server uninstall이고 네임스페이스 관련 플래그가 존재하지 않아서 기본 네임스페이스로 지정해놓고 삭제해야 삭제된다는 부분이다.(아직 도입된 지 얼마 안 되어서인지 삭제는 hang이 걸리는 경우가 종종 있었다.)
1$ waypoint server uninstall -auto-approve --platform=kubernetes
2Uninstalling Waypoint server with context "install-1616160032"
3✓ Snapshot "waypoint-server-snapshot-1616161765" generated
4✓ Statefulset and pods deleted
5✓ Persistent Volume Claim deleted
6✓ Service deleted
7Waypoint server successfully uninstalled for kubernetes platform
Comments