

Probot으로 GitHub App 만들기
Probot은 GitHub App을 쉽게 만들 수 있는 프레임워크다. 기존에 사용하던 GitHub Service는 2018년 10월 1일부로 더는 지원하지 않기 때문에 앞으로 GitHub에서 기능을 확장하거나 통합하려면 GitHub App을 사용해야 한다.

Probot은 Node.js로 만들어진 프레임워크인데 알게 된 지는 좀 되었지만 몇 달 전부터 사용을 해보고 있다. 사용해 보니 GitHub App을 쉽게 만들 수 있게 인터페이스나 도구가 잘 갖추어져 있다. 만들기는 쉬운데 뭘 만들지가 더 어렵다.
Probot으로 만든 앱 목록을 보면 GitHub App으로 어떤 기능을 구현할 수 있는지 알 수 있고 전부 오픈소스이므로 비슷한 기능을 개발할 때 참고해서 사용할 수 있다.
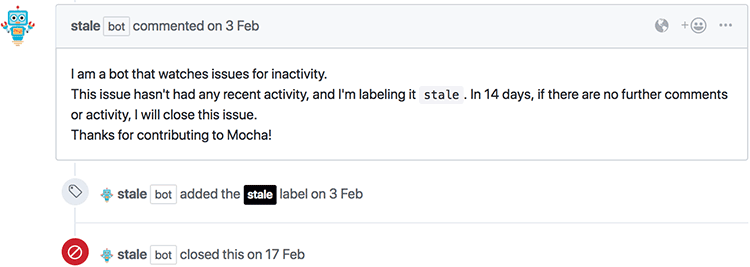
Stale은 mocha에서처럼 이슈에 일정 시간 동안 활동이 없으면 더는 활동이 없으면 닫겠다고 알린 뒤에 해당 시간이 지나면 이슈를 닫는다.

Henry Zhu가 An Issue with Issues에서 이미 닫힌 이슈에 사람들이 글을 계속 남겨서 관리 부담이 커지는 것을 막기 위해서 Babel에서 Lock Threads를 이용해서 이슈를 잠갔다.
Probot으로 GitHub App 만들기
최초 앱 구조를 만들기 쉽도록 create-probot-app을 제공하고 있다.
 1$ npx create-probot-app ping-app
 2npx: 227개의 패키지를 4.522초만에 설치했습니다.
 3Let's create a Probot app!
 4? App name: ping-app
 5? Description of app: An example app
 6? Author's full name: Outsider
 7? Author's email address:
 8? Homepage:
 9? GitHub user or org name: outsideris
10? Repository name: ping-app
11created file: /Users/outsider/example/ping-app/.env.example
12created file: /Users/outsider/example/ping-app/.gitignore
13created file: /Users/outsider/example/ping-app/.travis.yml
14created file: /Users/outsider/example/ping-app/CODE_OF_CONDUCT.md
15created file: /Users/outsider/example/ping-app/CONTRIBUTING.md
16created file: /Users/outsider/example/ping-app/LICENSE
17created file: /Users/outsider/example/ping-app/README.md
18created file: /Users/outsider/example/ping-app/index.js
19created file: /Users/outsider/example/ping-app/package.json
20created file: /Users/outsider/example/ping-app/.github/CODEOWNERS
21created file: /Users/outsider/example/ping-app/test/index.test.js
22created file: /Users/outsider/example/ping-app/test/fixtures/issues.opened.json
23Finished scaffolding files!
24
25Installing Node dependencies!
26
27npm notice created a lockfile as package-lock.json. You should commit this file.
28added 995 packages from 533 contributors in 31.587s
29[+] no known vulnerabilities found [22357 packages audited]
30
31
32Done! Enjoy building your Probot app!
위 명령어로 필요한 모든 파일을 만들어주고 필요한 npm 모듈도 설치해 준다.
GitHub App은 보통 개발자가 앱을 GitHub에 등록하고 이 앱을 저장소에 설치하면 해당 저장소에서 이벤트를 받아서 Probot이 처리하게 된다. 서버를 공개적으로 배포했다면 상관없지만, 로컬에서 개발할 때는 GitHub이 로컬 Probot 서버에 웹 훅을 바로 보낼 수 없으므로 프락시 서버를 두어야 한다. Probot 팀에서는 smee.io라는 서비스를 만들어서 제공하고 있다. 이를 사용하면 GitHub의 웹 훅을 smee.io가 대신 받아서 로컬 서버에 보내주기 때문에 개발을 편하게 할 수 있다.
앞에서 만들어진 .env.example 파일을 .env 파일로 복사한다. 이 내용은 아래와 같다.
1# The ID of your GitHub App
2APP_ID=
3WEBHOOK_SECRET=development
4
5# Use `trace` to get verbose logging or `info` to show less
6LOG_LEVEL=debug
7
8# Go to https://smee.io/new set this to the URL that you are redirected to.
9WEBHOOK_PROXY_URL=
smee.io에서 "Start a new channel"을 누르면 아래처럼 새로운 프락시 URL을 만들어 준다.
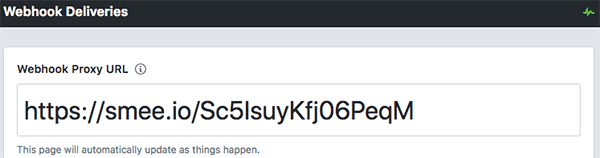
위의 .env 파일의 WEBHOOK_PROXY_URL로 smee.io의 URL을 지정한다.
1WEBHOOK_PROXY_URL=https://smee.io/Sc5IsuyKfj06PeqM
Developer settings 아래 Register new GitHub App에서 새로운 GitHub 앱을 등록할 수 있다.
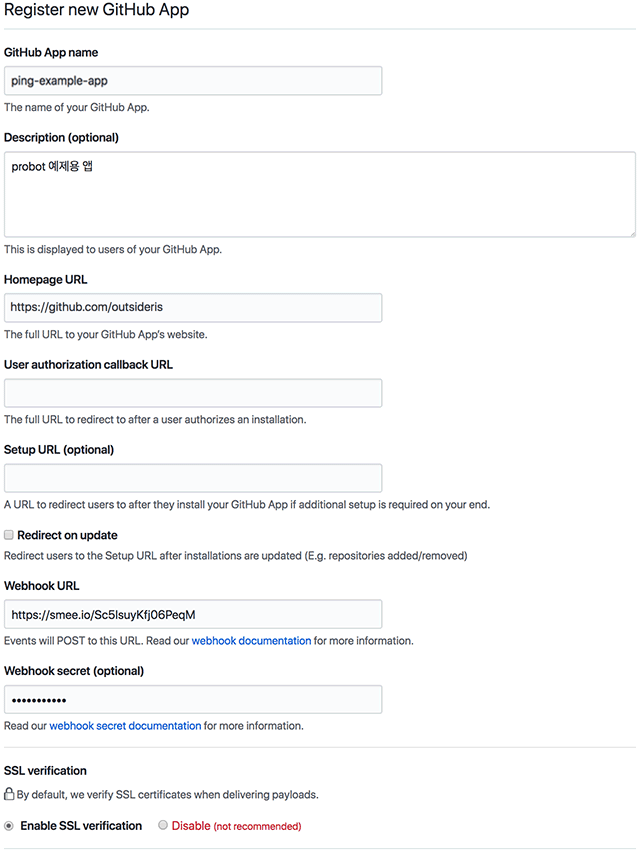
앱의 이름을 지정하고 Webhook URL에 위의 smee.io URL을 입력한다.. Webhook secret에는 .env의 WEBHOOK_SECRET에 있는 development를 입력한다.

하단 Permissions 부분에서는 사용할 권한을 지정한다. 이는 나중에 앱을 설치할 때 설치하는 사람에게 어떤 권한을 쓰는지 알려주게 된다. 예를 들어 이슈 내용을 가져올 것이면 Issues를 "Read-only"로 지정하면 되고 앱이 댓글도 남기려면 "Read & write"로 지정하면 된다.
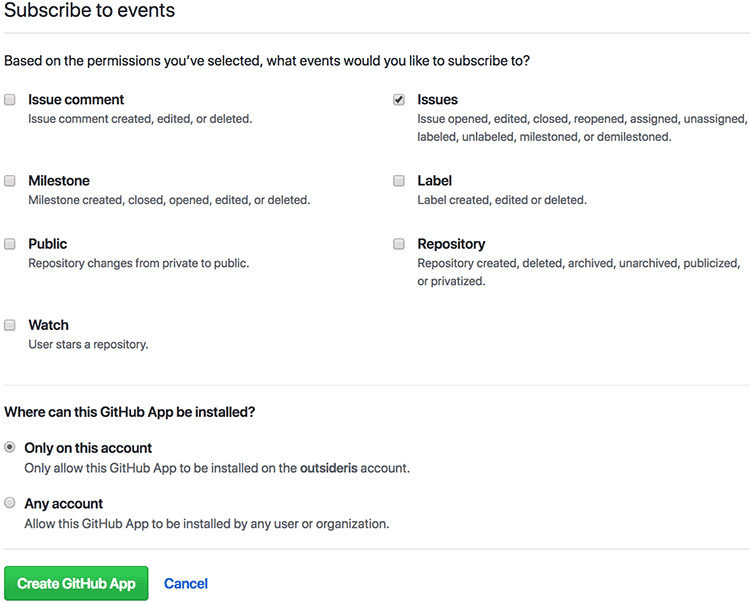
지정한 권한에 따라 웹 훅을 받을 이벤트를 체크한다. 여기선 예제로 Issues 이벤트만 받도록 지정했다. 마지막으로 아직 테스트 중이므로 "Only on this account"를 선택해서 내 계정에서만 사용할 수 있게 지정했다.
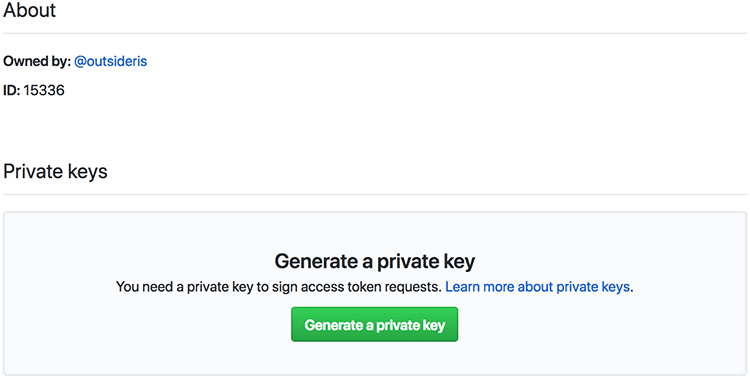
앱을 등록하고 나면 Basic information 중간에서 등록된 앱 ID를 볼 수 있다. 이 ID를 .env 파일의 APP_ID=에 지정한다. Generate a private key를 클릭하면 ping-example-app.2018-07-29.private-key.pem와 같은 키 파일이 다운로드되는데 이를 프로젝트 루트 위치로 이동시킨다.
GitHub 앱 설치
등록한 앱을 GitHub 저장소에 설치해야 사용할 수 있다.
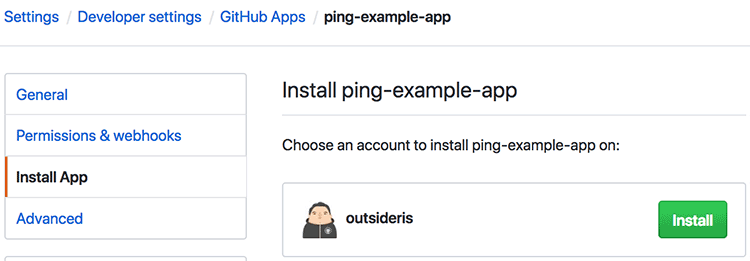
현재는 내 계정에서만 설치할 수 있으므로 앱 설정 화면에서 설치할 수 있다.
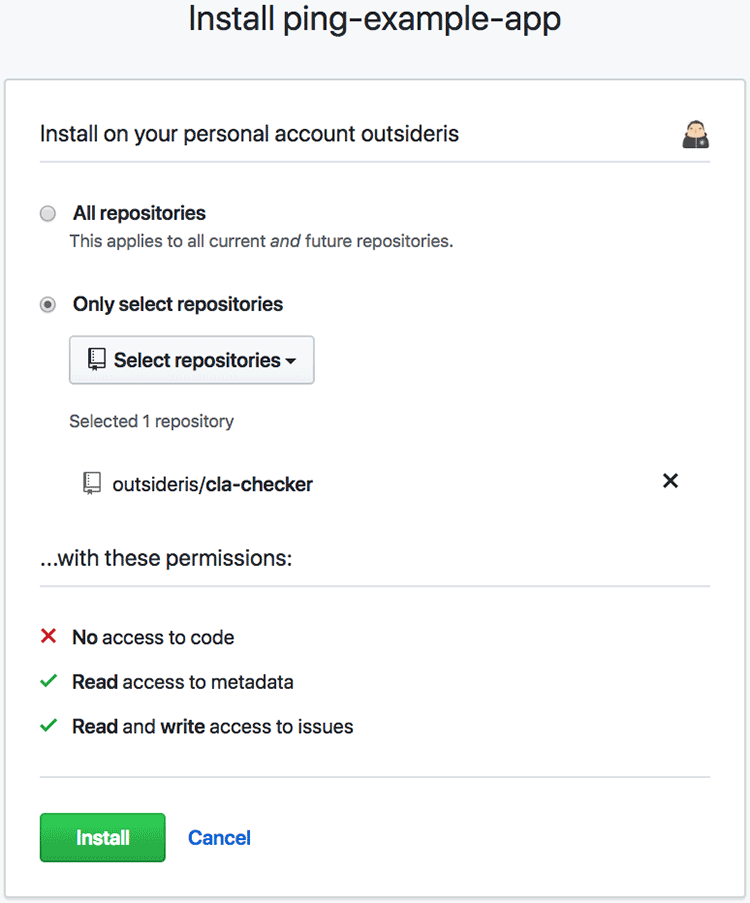
사용할 저장소를 지정한 뒤에 설치한다.
Probot 서버 테스트
앞에서 만들어진 index.js의 내용은 다음과 같다.
 1/**
 2 * This is the entry point for your Probot App.
 3 * @param {import('probot').Application} app - Probot's Application class.
 4 */
 5module.exports = app => {
 6  // Your code here
 7  app.log('Yay, the app was loaded!')
 8
 9  app.on('issues.opened', async context => {
10    app.log('hello');
11    const issueComment = context.issue({ body: 'Thanks for opening this issue!' })
12    return context.github.issues.createComment(issueComment)
13  })
14
15  // For more information on building apps:
16  // https://probot.github.io/docs/
17
18  // To get your app running against GitHub, see:
19  // https://probot.github.io/docs/development/
20}
app.on('issues.opened', async context => {})부분이 GitHub의 이벤트를 받는 부분이다. 이슈가 열렸을 때 발생하는 이벤트인 issues.opened가 웹 훅으로 오면 이 함수가 실행된다. 여러 이벤트를 받을 때는 app.on(['issues.opened', 'issues.closed'], callback)처럼 받으면 된다. 이벤트 이름은 GitHub 문서에서 확인할 수 있는데 이벤트 이름과 종류를 조합해서 사용하면 된다.
그리고 context.github.issues.createComment는 댓글을 남기는 함수이다. 즉, 이슈가 만들었지만 앱이 Thanks for opening this issue!라는 댓글을 남기게 된다. 여기서 context.github는 @octokit/rest의 객체이므로 GitHub API에 필요한 부분은 Octokit 문서를 확인하면 된다.
 1$ npm start
 2
 3> ping-app@1.0.0 start /Users/outsider/Dropbox/projects/temp/ping-app
 4> probot run ./index.js
 5
 613:15:03.322Z  INFO probot: Yay, the app was loaded!
 713:15:03.439Z  INFO probot: Forwarding https://smee.io/Sc5IsuyKfj06PeqM to http://localhost:3000/
 813:15:03.442Z  INFO probot: Listening on http://localhost:3000
 913:15:04.239Z  INFO probot: Connected https://smee.io/Sc5IsuyKfj06PeqM
1013:15:04.546Z DEBUG github: GitHub request: GET /app/installations - 200 OK (installation=undefined)
11  params: {
12    "per_page": 100,
13    "baseUrl": "https://api.github.com",
14    "request": {
15      "timeout": 0
16    }
17  }
1813:15:05.101Z DEBUG github: GitHub request: POST /installations/:installation_id/access_tokens - 201 Created (installation=264944)
19  params: {
20    "installation_id": "264944",
21    "baseUrl": "https://api.github.com",
22    "request": {
23      "timeout": 0
24    }
25  }
2613:15:06.194Z DEBUG github: GitHub request: GET /installation/repositories - 200 OK (installation=264944)
27  params: {
28    "per_page": 100,
29    "baseUrl": "https://api.github.com",
30    "request": {
31      "timeout": 0
32    }
33  }
위처럼 npm start로 서버를 시작하고 GitHub에서 새로운 이슈를 만들면 smee.io를 통해 아래처럼 웹 훅을 받게 된다.
 113:15:47.256Z DEBUG probot: Webhook received
 2  event: {
 3    "event": "issues.opened",
 4    "id": "816ee850-9331-11e8-847b-59be5276fdff",
 5    "installation": 264944,
 6    "repository": "outsideris/cla-checker"
 7  }
 813:15:47.265Z  INFO probot: hello
 913:15:47.922Z DEBUG github: GitHub request: POST /repos/:owner/:repo/issues/:number/comments - 201 Created (id=816ee850-9331-11e8-847b-59be5276fdff, installation=264944)
10  params: {
11    "number": 17,
12    "owner": "outsideris",
13    "repo": "cla-checker",
14    "body": "Thanks for opening this issue!",
15    "baseUrl": "https://api.github.com",
16    "request": {
17      "timeout": 0
18    }
19  }
2013:15:47.925Z  INFO http: POST / 200 - 670.04 ms (id=70fc935d-fab6-4af4-8f83-20f4de2a7e2d)
2113:15:47.929Z  INFO probot: POST http://localhost:3000/ - 200
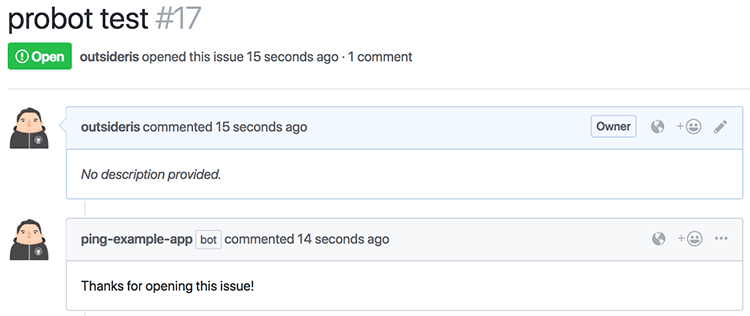
ping-example-app에 아이콘을 올리지 않아서 내 아이콘이 사용되었지만 새로 만든 이슈에 제대로 달린 것을 볼 수 있다.
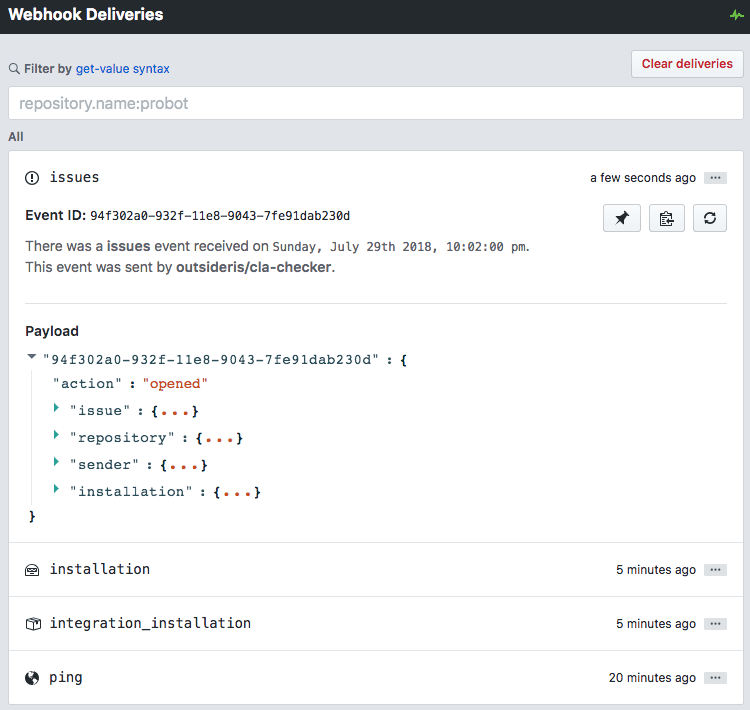
smee.io를 보면 전달된 웹 훅이 다 기록되어 있고 이를 재전송할 수 있다. GitHub과 연동해서 만들어야 하므로 이슈를 등록했다가 오류가 있으면 이슈를 다시 등록해서 테스트해야 하므로 smee.io의 이런 기능은 개발할 때 무척 편리하다.
설치과정이 좀 복잡했지만, 내용은 아주 어렵지 않다. 특히 인터페이스가 잘 되어 있어서 아주 쉽게 GitHub에서 필요한 부분을 자동화할 수 있다.
Comments