개인적인 취향으로 Jenkins를 좋아하진 않는데 젠킨스에서 올 초에 Jenkins X를 공개했다. Jenkins가 전통적인 CI라는 인상이 있는데 요즘 추세인 Kubernetes에 적합한 CI/CD 도구로 Jenkins X를 내놓은 것이다. 그동안 특별히 관심을 가지지 않다가 최근 Kubernetes와 조합해서 사용할 만한지 테스트를 해봤다.
Jenkins X
Jenkins X의 모든 문서를 자세히 본 것은 아니지만 이번에 테스트해보면서 파악한 것은 Jenkins X는 기존의 Jenkins를 Kubernetes 환경에 적합하게 감싸고 추가 도구를 제공한다고 보는 게 맞는 것 같다. jx라는 도구가 Jenkins X의 핵심 도구인데 jx로 Kubernetes 클러스터를 생성하거나 설정해서 사용할 수 있고 Jenkins X를 설치한다는 것은 CI인 Jenkins, 아티팩트 저장소인 Nexus, Helm Chart 저장소인 Chartmuseum, Helm Chart의 UI인 Monocular 등을 Helm Chart로 만들어서 Kubernetes 클러스터에 설치해서 연동하는 것을 의미한다.
그래서 Jenkins X를 설치해도 실제로 사용하는 것은 Jenkins와 추가 서비스들이 Kubernetes와 연동되어 있을 뿐이다. 그래서 처음에 내가 별로 좋아하지 않다고 했던 Jenkins를 다시 만나게 되었다. 구체적인 CI/CD 연동은 Jenkins의 사용방법과 같으므로 여기서는 이번에 테스트해 본 Jenkins X의 설치방법을 정리한다.
jx로 Kubernetes 클러스터에 설치하기
jx로 Kubernetes 클러스터를 생성할 수도 있지만, 일반적인 사용 패턴을 생각한다면 Kubernetes 클러스터는 이미 사용하고 있고 여기에 Jenkins X를 설치해서 사용하는 것이 자연스러워 보였기 때문에 따로 클러스터를 생성하고 Jenkins X를 설치했다. Kubernetes 학습이 목적이 아니므로 사용하기 편한 GKE에 Kubernetes 클러스터를 생성해서 사용했다. 대신 워커 인스턴스를 4개 정도로 늘렸다. 인스턴스를 2개만 띄우니까 설치가 완료된 이후 CPU가 부족해서 빌더 Pod이 실행되지 않았다.
생성한 클러스터의 이름이 jenkinsx라고 했을 때 클러스터에 연결해서 Jenkins X를 설치하려면 클러스터의 인증정보가 필요하므로 gcloud로 인증정보를 가져온다.
$ gcloud container clusters get-credentials jenkinsx
Fetching cluster endpoint and auth data.
kubeconfig entry generated for jenkinsx
jx를 설치한 뒤에 컨텍스트를 확인해 보면 GKE에 설치한 클러스터가 연결된 것을 확인할 수 있다.
$ jx context
? Change kubernetes context: gke_test-12345_asia-northeast1-a_jenkinsx
Using namespace 'default' from context named 'gke_devenv-205606_asia-northeast1-a_jenkinsx' on server 'https://35.194.114.88'.
이는 kubectl config get-contexts로 확인해 봐도 같은 컨텍스트를 보고 있음을 알 수 있다. 즉 jx의 명령어를 사용하면서도 kubectl을 같이 사용할 수 있다.
Jenkins X를 설치하려면 Kubernetes 클러스터에 RBAC이 활성화되어 있어야 한다. 이는 정확하지는 않는데 몇 가지 확인을 해보니 GKE 클러스터에 기본으로 RBAC가 활성화되어 있지는 않을 것 같아서 다음 명령어로 활성화했다.
$ kubectl create clusterrolebinding cluster-admin-binding \
  --clusterrole cluster-admin --user outsider@example.com
clusterrolebinding.rbac.authorization.k8s.io "cluster-admin-binding" created
jx compliance run로 클러스터가 Jenkins X를 설치할 환경에 맞는지 확인할 수 있다.
$ jx compliance run
INFO[0005] created object                                name=heptio-capwood namespace= resource=namespaces
INFO[0005] created object                                name=capwood-serviceaccount namespace=heptio-capwood resource=serviceaccounts
INFO[0005] created object                                name=capwood-serviceaccount-heptio-capwood namespace= resource=clusterrolebindings
INFO[0005] created object                                name=capwood-serviceaccount namespace= resource=clusterroles
INFO[0006] created object                                name=capwood-config-cm namespace=heptio-capwood resource=configmaps
INFO[0006] created object                                name=capwood-plugins-cm namespace=heptio-capwood resource=configmaps
INFO[0006] created object                                name=capwood namespace=heptio-capwood resource=pods
INFO[0006] created object                                name=capwood-master namespace=heptio-capwood resource=services
위 명령어를 실행하면 환경을 테스트하기 시작하는데 다음 명령어로 진행상태를 확인할 수 있다.
$ jx compliance status
Compliance tests are still running, it can take up to 60 minutes.
위 명령어대로 이는 1시간 정도의 시간이 걸린다. 1시간 후에 다시 확인해 보면 테스트가 완료된 것을 알 수 있다.
$ jx compliance status
Compliance tests completed. Use `jx compliance results` to display the results.
jx compliance results를 실행하면 환경 테스트의 결과를 볼 수 있다.
$ jx compliance results
STATUS TEST
PASSED [k8s.io] Docker Containers should be able to override the image's default arguments (docker cmd) [NodeConformance] [Conformance]
PASSED [k8s.io] Docker Containers should be able to override the image's default command (docker entrypoint) [NodeConformance] [Conformance]
PASSED [k8s.io] Docker Containers should be able to override the image's default command and arguments [NodeConformance] [Conformance]
PASSED [k8s.io] Docker Containers should use the image defaults if command and args are blank [NodeConformance] [Conformance]
...중략...
PASSED [sig-storage] Secrets should be consumable from pods in volume with mappings [NodeConformance] [Conformance]
PASSED [sig-storage] Secrets should be consumable from pods in volume with mappings and Item Mode set [NodeConformance] [Conformance]
PASSED [sig-storage] Secrets should be consumable in multiple volumes in a pod [NodeConformance] [Conformance]
모든 테스트가 PASSED로 나왔으므로 이제 Jenkins X를 설치하면 된다.
$ jx install
? Cloud Provider gke
Git configured for user: Outsider and email outsider@example.com
Trying to create ClusterRoleBinding outsider-example-com-cluster-admin-binding for role: cluster-admin for user outsider@example.com
: clusterrolebindings.rbac.authorization.k8s.io "outsider-example-com-cluster-admin-binding" not foundCreated ClusterRoleBinding outsider-example-com-cluster-admin-binding
Created ServiceAccount tiller in namespace kube-system
Trying to create ClusterRoleBinding tiller for role: cluster-admin and ServiceAccount: kube-system/tiller
Created ClusterRoleBinding tiller
Initialising helm using ServiceAccount tiller in namespace kube-system
helm installed and configured
? No existing ingress controller found in the kube-system namespace, shall we install one? Yes
Waiting for external loadbalancer to be created and update the nginx-ingress-controller service in kube-system namespace
Note: this loadbalancer will fail to be provisioned if you have insufficient quotas, this can happen easily on a GKE free account. To view quotas run: gcloud compute project-info describe
External loadbalancer created
Waiting to find the external host name of the ingress controller Service in namespace kube-system with name jxing-nginx-ingress-controller
You can now configure a wildcard DNS pointing to the new loadbalancer address 35.190.233.207

If you do not have a custom domain setup yet, Ingress rules will be set for magic dns nip.io.
Once you have a customer domain ready, you can update with the command jx upgrade ingress --cluster
If you don't have a wildcard DNS setup then setup a new CNAME and point it at: 35.190.233.207.nip.io then use the DNS domain in the next input...
? Domain 35.190.233.207.nip.io
nginx ingress controller installed and configured
Lets set up a git username and API token to be able to perform CI/CD

? Do you wish to use outsideris as the GitHub username for CI/CD pipelines: Yes
Cloning the Jenkins X cloud environments repo to /Users/outsider/.jx/cloud-environments
? A local Jenkins X cloud environments repository already exists, recreate with latest? Yes
Cloning the Jenkins X cloud environments repo to /Users/outsider/.jx/cloud-environments
Counting objects: 797, done.
Compressing objects: 100% (4/4), done.
Total 797 (delta 0), reused 1 (delta 0), pack-reused 793
Generated helm values /Users/outsider/.jx/extraValues.yaml
Installing Jenkins X platform helm chart from: /Users/outsider/.jx/cloud-environments/env-gke
waiting for install to be ready, if this is the first time then it will take a while to download images
Jenkins X deployments ready in namespace jx


  ********************************************************

       NOTE: Your admin password is: mousenebula

  ********************************************************

  Getting Jenkins API Token
using url http://jenkins.jx.35.190.233.207.nip.io/me/configure
logging in
Getting the API Token...
Found API Token
Created user admin API Token for Jenkins server jenkins.jx.35.190.233.207.nip.io at http://jenkins.jx.35.190.233.207.nip.io
Updating Jenkins with new external URL details http://jenkins.jx.35.190.233.207.nip.io
Creating default staging and production environments
Using git provider GitHub at https://github.com

About to create repository environment-capwood-staging on server https://github.com with user outsideris

Creating repository outsideris/environment-capwood-staging
Creating git repository outsideris/environment-capwood-staging
Pushed git repository to https://github.com/outsideris/environment-capwood-staging

Created environment staging
Created Jenkins Project: http://jenkins.jx.35.190.233.207.nip.io/job/outsideris/job/environment-capwood-staging/

Note that your first pipeline may take a few minutes to start while the necessary images get downloaded!

Creating github webhook for outsideris/environment-capwood-staging for url http://jenkins.jx.35.190.233.207.nip.io/github-webhook/
Using git provider GitHub at https://github.com


About to create repository environment-capwood-production on server https://github.com with user outsideris


Creating repository outsideris/environment-capwood-production
Creating git repository outsideris/environment-capwood-production
Pushed git repository to https://github.com/outsideris/environment-capwood-production

Created environment production
Created Jenkins Project: http://jenkins.jx.35.190.233.207.nip.io/job/outsideris/job/environment-capwood-production/

Note that your first pipeline may take a few minutes to start while the necessary images get downloaded!

Creating github webhook for outsideris/environment-capwood-production for url http://jenkins.jx.35.190.233.207.nip.io/github-webhook/

Jenkins X installation completed successfully


  ********************************************************

       NOTE: Your admin password is: mousenebula

  ********************************************************


Your kubernetes context is now set to the namespace: jx
To switch back to your original namespace use: jx ns default
For help on switching contexts see: https://jenkins-x.io/developing/kube-context/

To import existing projects into Jenkins:       jx import
To create a new Spring Boot microservice:       jx create spring -d web -d actuator
To create a new microservice from a quickstart: jx create quickstart
로그가 꽤 긴데 나중에 확인도 할 겸 모든 로그를 다 붙여넣었다. 여기서 꽤 많은 작업이 이루어졌다. 일단 클라우드 프로바이더를 선택해야 하는데 여기선 GKE를 사용하므로 GKE를 선택했다.

중간에 GitHub 계정 연동이 나오는데 이를 연동하면 설치가 완료된 후에 내 GitHub 저장소에 위처럼 staging과 production 용 저장소를 2개 만들게 된다. Jenkins X를 CI/CD 용으로 제대로 써본 것은 아니라 자세히 설명할 수는 없지만, Jenkins는 환경을 여러 개 만들어 놓고 테스트가 끝나면 다음 환경으로 서비스를 이동시킬 수 있다. staging와 production이 클러스터에 설치되는 기본 환경이 되고 이 두 저장소에서 각 환경의 설정을 관리하게 된다.
$ jx status
Jenkins X checks passed for Cluster(gke_test-12345_asia-northeast1-a_jenkinsx): 4 nodes, memory 25% of 10808824Ki, cpu 64% of 3760m. Jenkins is running at http://jenkins.jx.35.190.233.207.nip.io
Kubernetes 클러스터 내에 설치된 Jenkins에 접속 할 수 있도록 NIP.IO를 이용해서 Jenkins의 IP를 연결해 주므로 http://jenkins.jx.35.190.233.207.nip.io로 접속할 수 있다.

Jenkins 외 다른 서비스의 접속 주소는 다음과 같이 확인해 볼 수 있다.
$ jx open
Name                      URL
jenkins                   http://jenkins.jx.35.190.233.207.nip.io
jenkins-x-chartmuseum     http://chartmuseum.jx.35.190.233.207.nip.io
jenkins-x-docker-registry http://docker-registry.jx.35.190.233.207.nip.io
jenkins-x-monocular-api   http://monocular.jx.35.190.233.207.nip.io
jenkins-x-monocular-ui    http://monocular.jx.35.190.233.207.nip.io
nexus                     http://nexus.jx.35.190.233.207.nip.io
Jenkins X에 애플리케이션 등록하기
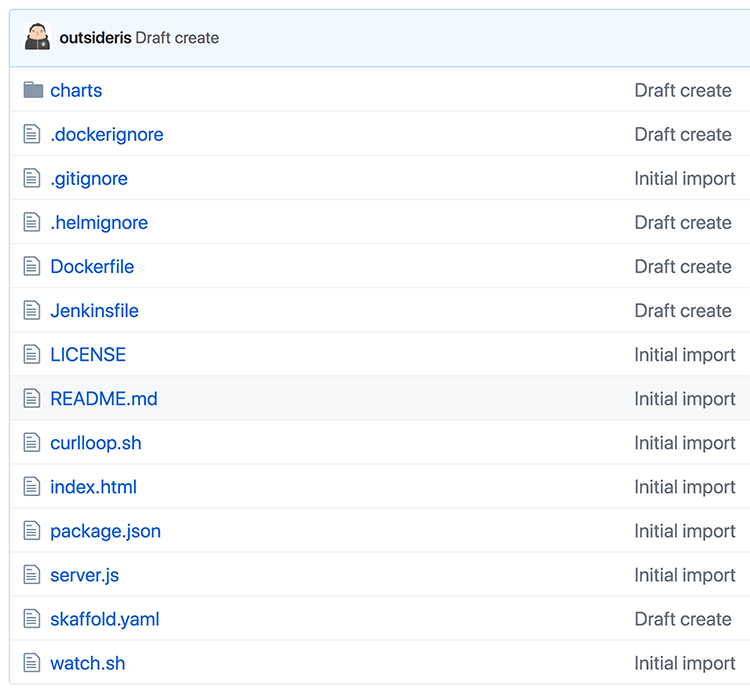
jx create quickstart 명령어를 사용하면 예제용 프로젝트를 만들어서 등록할 수 있다. 여기에는 기본적으로 node-http, golang-http, python-http, spring-boot-web 등 다양하게 제공하고 있다. 이미 존재하는 저장소를 jx import로 등록할 수도 있지만 Jenkinsfile과 Jenkins X에서 사용할 Helm Chart 등을 만들어 주어야 하므로 처음에는 quickstart를 사용하는 편이 더 나은 것 같다.

이렇게 생성된 저장소를 보면 파일이 꽤 많다. Node 예제 파일보다 설정 파일이 꽤 많이 존재하고 charts 폴더 아래에는 Jenkins X가 Kubernetes에 배포할 Helm Chart 파일이 있다. 간단한 테스트만 했으므로 각 파일의 세세한 설정 등은 테스트해보지 못했다.
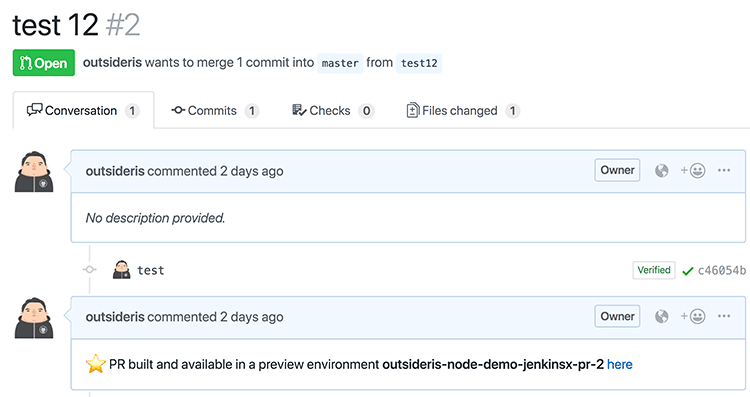
이 프로젝트 저장소에 Pull Request가 올라오면 Jenkins X가 자동으로 배포하고 프리뷰를 할 수 있는 URL을 제공한다. 배포가 완료되면 아래처럼 댓글로 프리뷰를 볼 수 있는 URL을 알려준다.

jx를 통해서 배포된 프리뷰의 목록을 볼 수도 있다.
$ jx get previews
PULL REQUEST                                            NAMESPACE                             APPLICATION
https://github.com/outsideris/node-demo-jenkinsx/pull/1 jx-outsideris-node-demo-jenkinsx-pr-1 http://node-http.jx-outsideris-node-demo-jenkinsx-pr-1.35.190.233.207.nip.io
https://github.com/outsideris/node-demo-jenkinsx/pull/2 jx-outsideris-node-demo-jenkinsx-pr-2 http://node-http.jx-outsideris-node-demo-jenkinsx-pr-2.35.190.233.207.nip.io
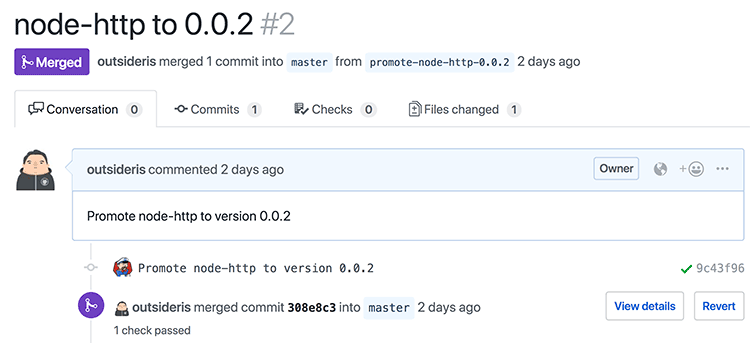
Pull Request를 머지하거나 master 브랜치에 새 커밋을 푸시하면 새로운 버전이 릴리스 된 거로 간주하고 이를 스테이징 환경에 배포한다.

위에서 보듯이 앞에서 만든 staging 저장소에 버전을 올리는 Pull Request를 만들고 자동으로 머지까지 한다. 이렇게 되면 프리뷰 외에 스테이징 환경에서도 애플리케이션을 배포하고 접속해 볼 수 있게 관리해 준다.


Comments