이전 글에서 Terraform에 대해서 가볍게 살펴봤지만, 그 글만으로는 Terraform이 정확히 뭘 하는지 파악하기 어려울 것이다. 실제로 사용해 보면 Terraform 자체의 기능은 아주 단순하고 Terraform을 사용할 때의 대부분 작업은 문서를 보고 원하는 인프라스트럭처를 HCL 파일로 작성하는 것이다. 제대로 HCL 파일만 작성하면 사용은 아주 간단하지만, UI 등으로 사용하던 인프라 설정을 HCL로만 작성하려면 경험상 꽤 많은 삽질이 필요하다. 코드로 보면 헷갈리는 부분도 많고 의존성 관계도 헷갈리기도 하고 때로는 프로바이더의 기능 명과 Terraform에서 정의한 리소스 타입의 이름이 약간 달라서 어렵기도 하다.
Terraform을 사용하려면 일단 Provider에서 사용할 서비스의 문서를 찾아봐야 한다. GitHub 프로바이더를 사용한다면 Terraform으로 저장소나 팀 등을 관리할 수 있지만 가장 많이 사용할 것으로 보이는 AWS Provider로 간단한 인프라를 구성하면서 사용방법을 살펴보겠다.
AWS Provider 설정
가장 먼저 해야 할 일은 Provider 설정이다.

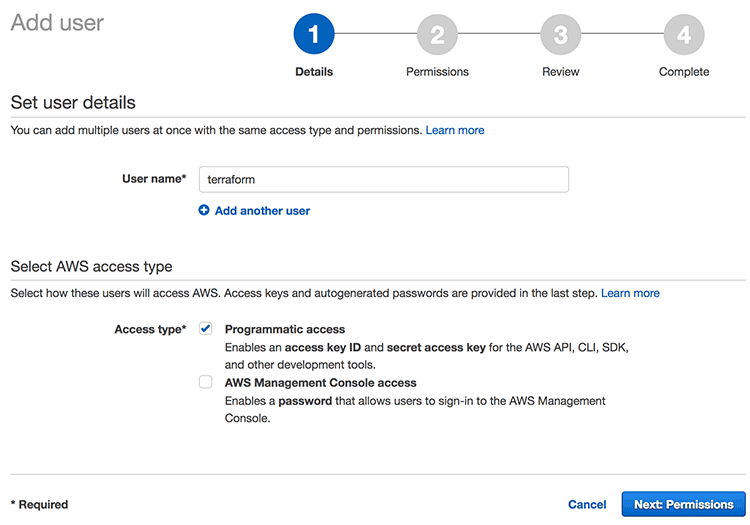
AWS IAM에 가서 Terraform이 사용할 계정을 만든다. 이 계정으로 인프라를 다룰 것이므로 "Programmatic access"만 체크하고 여기서는 terraform이라는 이름을 사용했다.

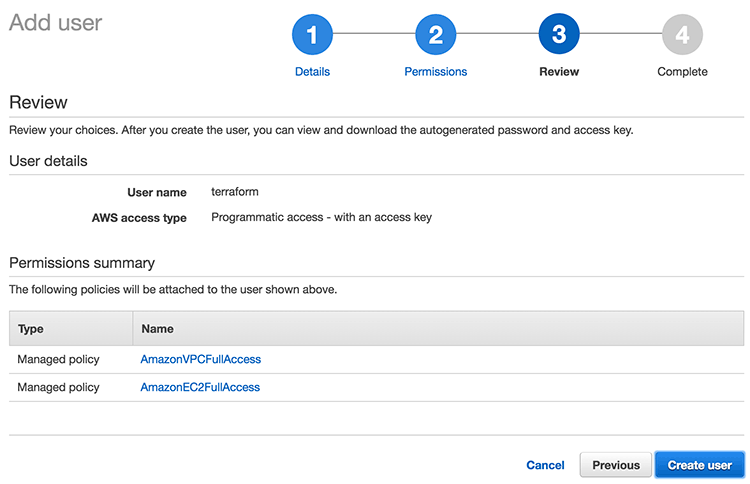
VPC를 구성해서 EC2 인스턴스를 띄워볼 예정이므로 두 서비스에 대한 전체권한을 다 주었다. 여기서는 두 서비스만 주었지만, 이 계정으로 Terraform이 AWS에 인프라를 구성할 것이므로 관련된 모든 서비스의 권한을 다 가져야 한다. 생성된 계정에 할당된 access key와 secret key로 다음과 같은 aws.tf 파일을 생성한다. 여기서 Region은 도쿄를 사용할 것이므로 ap-northeast-1를 지정했다.
provider "aws" {
  access_key = "YOUR-ACCESS-KEY"
  secret_key = "YOUR-SECRET-KEY"
  region     = "ap-northeast-1"
}
이제 AWS 리소스를 정의할 때 이 파일을 이용하게 되고 AWS를 Terraform으로 구성할 준비는 다 된것이다. 구성할 수 있는 리소스는 문서에 나온 대로 API Gateway, App Autoscaleing, CloudFomation, CloudFront, CloudWatch, CodeCommit, CodeDeploy, DynamoDB, EC2, ECS, ElasticCache, Elastic Beanstalk, ElasticSearch, IAM, Kinesis, Lambda, OpsWorks, RDS, RedShift, Route53, S3, SES, SimpleDB, SNS, SQS, VPC 등 AWS의 거의 모든 인프라를 사용할 수 있다. AWS에서 새로운 서비스가 나오면 Terraform에서 추가를 해주어야 사용할 수 있다.
VPC 구성
VPC부터 Terraform으로 구성해서 사용하는 방식을 생각해 본다. vpc.tf라는 파일을 만들어서 다음 내용을 입력한다.
resource "aws_vpc" "example" {
  cidr_block = "172.10.0.0/20"
  tags {
    Name = "example"
  }
}

resource "aws_subnet" "example-a" {
  vpc_id = "${aws_vpc.example.id}"
  cidr_block = "172.10.0.0/24"
  availability_zone = "ap-northeast-1a"
}

resource "aws_subnet" "example-c" {
  vpc_id = "${aws_vpc.example.id}"
  cidr_block = "172.10.1.0/24"
  availability_zone = "ap-northeast-1c"
}
여기서는 리소스를 3개 구성하는데 VPC를 하나 만들고(aws_vpc) VPC에서 사용할 서브넷을 2개 만들었다(aws_subnet). 이전 글에서 설명했듯이 AWS 프로바이더의 리소스이므로 리소스 타입의 이름의 접두사에 aws_가 붙은 것을 볼 수 있다. 이 리소스 타입은 Terraform에서 미리 정의된 이름이므로 문서를 봐야 한다. 그 뒤에 온 example, example-a 같은 이름은 개발자가 인식하기 쉽게 이름을 지정한 것이다. 그래서 example이라는 VPC를 정의하고 서브넷을 정의할 때는 앞에서 정의한 리소스의 ID를 ${aws_vpc.example.id}처럼 참조해서 VPC 내에 서브넷을 정의한 것이다.
VPC를 생성하기 전에 추가로 VPC에서 사용할 시큐리티 그룹까지 한꺼번에 설정해보자. 다음 파일은 security-group.tf의 내용이다.
resource "aws_security_group" "example-allow-all" {
  name = "example-allow_all"
  description = "Allow all inbound traffic"
  vpc_id = "${aws_vpc.example.id}"

  ingress {
    from_port = 0
    to_port = 0
    protocol = "-1"
    cidr_blocks = ["0.0.0.0/0"]
  }

  egress {
    from_port = 0
    to_port = 0
    protocol = "-1"
    cidr_blocks = ["0.0.0.0/0"]
  }
}
여기서도 마찬가지로 인바운드/아웃바운드를 모두 허용하는 시큐리티 그룹을 VPC 내에서 생성하는 설정이다.
├── aws.tf
├── security-group.tf
└── vpc.tf
이제 현재 디렉터리의 위처럼 3개의 파일이 존재한다. Terraform이 로딩은 알파벳순으로 하지만 알아서 의존성 관계를 맺어주므로 리소스 정의 순서는 전혀 상관이 없다. 그래서 security-group.tf에서 vpc.tf를 참조해도 아무런 문제가 일어나지 않으므로 설정 파일을 필요에 맞게 나누어서 구성하면 된다.
Terraform으로 적용하기
여태 설정 파일만 살펴보았는데 이제 실제로 Terraform을 사용해보자.
Terraform을 plan 기능을 제공하므로 실제 인프라를 AWS에 적용하기 전에 미리 테스트해볼 수 있다. 이 terraform plan 명령어로 설정이 이상 없는지도 확인하고 실제로 적용하면 인프라가 어떻게 달라지는지도 확인할 수 있다. 현재 폴더에서 terraform plan 명령어를 실행한다.
$ terraform plan
Refreshing Terraform state in-memory prior to plan...
The refreshed state will be used to calculate this plan, but
will not be persisted to local or remote state storage.


The Terraform execution plan has been generated and is shown below.
Resources are shown in alphabetical order for quick scanning. Green resources
will be created (or destroyed and then created if an existing resource
exists), yellow resources are being changed in-place, and red resources
will be destroyed. Cyan entries are data sources to be read.

Note: You didn't specify an "-out" parameter to save this plan, so when
"apply" is called, Terraform can't guarantee this is what will execute.

+ aws_security_group.example-allow-all
    description:                         "Allow all inbound traffic"
    egress.#:                            "1"
    egress.482069346.cidr_blocks.#:      "1"
    egress.482069346.cidr_blocks.0:      "0.0.0.0/0"
    egress.482069346.from_port:          "0"
    egress.482069346.prefix_list_ids.#:  "0"
    egress.482069346.protocol:           "-1"
    egress.482069346.security_groups.#:  "0"
    egress.482069346.self:               "false"
    egress.482069346.to_port:            "0"
    ingress.#:                           "1"
    ingress.482069346.cidr_blocks.#:     "1"
    ingress.482069346.cidr_blocks.0:     "0.0.0.0/0"
    ingress.482069346.from_port:         "0"
    ingress.482069346.protocol:          "-1"
    ingress.482069346.security_groups.#: "0"
    ingress.482069346.self:              "false"
    ingress.482069346.to_port:           "0"
    name:                                "example-allow_all"
    owner_id:                            "<computed>"
    vpc_id:                              "${aws_vpc.example.id}"

+ aws_subnet.example-a
    availability_zone:       "ap-northeast-1a"
    cidr_block:              "172.10.0.0/24"
    map_public_ip_on_launch: "false"
    vpc_id:                  "${aws_vpc.example.id}"

+ aws_subnet.example-c
    availability_zone:       "ap-northeast-1c"
    cidr_block:              "172.10.1.0/24"
    map_public_ip_on_launch: "false"
    vpc_id:                  "${aws_vpc.example.id}"

+ aws_vpc.example
    cidr_block:                "172.10.0.0/20"
    default_network_acl_id:    "<computed>"
    default_route_table_id:    "<computed>"
    default_security_group_id: "<computed>"
    dhcp_options_id:           "<computed>"
    enable_classiclink:        "<computed>"
    enable_dns_hostnames:      "<computed>"
    enable_dns_support:        "true"
    instance_tenancy:          "<computed>"
    main_route_table_id:       "<computed>"
    tags.%:                    "1"
    tags.Name:                 "example"


Plan: 4 to add, 0 to change, 0 to destroy.
새로 추가되는 설정은 +로 표시되는데 다음 4개가 추가된 것을 볼 수 있고 마지막에도 4개가 추가되는 것을 알 수 있다.
+ aws_security_group.example-allow-all+ aws_subnet.example-a+ aws_subnet.example-c+ aws_vpc.example
이 plan 기능은 미리 구성을 테스트해볼 수 있다는 점에서 엄청 매력적인 구성이고 실수로 인프라를 변경하지 않도록 확인해 볼 수 있는 장치이기도 하다. 그래서 HCL 파일을 작성하면서 plan으로 확인해 보고 다시 변경해보고 하면서 사용하면 된다.
plan에 이상이 없으므로 이제 적용해보자. 적용은 terraform apply 명령어를 사용한다.
$ terraform apply
aws_vpc.example: Creating...
  cidr_block:                "" => "172.10.0.0/20"
  default_network_acl_id:    "" => "<computed>"
  default_route_table_id:    "" => "<computed>"
  default_security_group_id: "" => "<computed>"
  dhcp_options_id:           "" => "<computed>"
  enable_classiclink:        "" => "<computed>"
  enable_dns_hostnames:      "" => "<computed>"
  enable_dns_support:        "" => "true"
  instance_tenancy:          "" => "<computed>"
  main_route_table_id:       "" => "<computed>"
  tags.%:                    "" => "1"
  tags.Name:                 "" => "example"
aws_vpc.example: Creation complete
aws_subnet.example-a: Creating...
  availability_zone:       "" => "ap-northeast-1a"
  cidr_block:              "" => "172.10.0.0/24"
  map_public_ip_on_launch: "" => "false"
  vpc_id:                  "" => "vpc-14ff2570"
aws_subnet.example-c: Creating...
  availability_zone:       "" => "ap-northeast-1c"
  cidr_block:              "" => "172.10.1.0/24"
  map_public_ip_on_launch: "" => "false"
  vpc_id:                  "" => "vpc-14ff2570"
aws_security_group.example-allow-all: Creating...
  description:                         "" => "Allow all inbound traffic"
  egress.#:                            "" => "1"
  egress.482069346.cidr_blocks.#:      "" => "1"
  egress.482069346.cidr_blocks.0:      "" => "0.0.0.0/0"
  egress.482069346.from_port:          "" => "0"
  egress.482069346.prefix_list_ids.#:  "" => "0"
  egress.482069346.protocol:           "" => "-1"
  egress.482069346.security_groups.#:  "" => "0"
  egress.482069346.self:               "" => "false"
  egress.482069346.to_port:            "" => "0"
  ingress.#:                           "" => "1"
  ingress.482069346.cidr_blocks.#:     "" => "1"
  ingress.482069346.cidr_blocks.0:     "" => "0.0.0.0/0"
  ingress.482069346.from_port:         "" => "0"
  ingress.482069346.protocol:          "" => "-1"
  ingress.482069346.security_groups.#: "" => "0"
  ingress.482069346.self:              "" => "false"
  ingress.482069346.to_port:           "" => "0"
  name:                                "" => "example-allow_all"
  owner_id:                            "" => "<computed>"
  vpc_id:                              "" => "vpc-14ff2570"
aws_subnet.example-a: Creation complete
aws_subnet.example-c: Creation complete
aws_security_group.example-allow-all: Creation complete

Apply complete! Resources: 4 added, 0 changed, 0 destroyed.

The state of your infrastructure has been saved to the path
below. This state is required to modify and destroy your
infrastructure, so keep it safe. To inspect the complete state
use the `terraform show` command.

State path: terraform.tfstate
적용이 완료되었다. 정말 제대로 적용되었는지 AWS에 들어가서 확인해 보자.


설정한 VPC, Subnet, Security Group이 모두 정상적으로 만들어 진 것을 볼 수 있다.
resource "aws_vpc" "example" {
  cidr_block = "172.10.0.0/20"
  tags {
    Name = "example"
  }
}
앞에서 정의한 VPC 구성을 보면 여기서 리소스 이름의 example은 실제 AWS 구성되는 이름과는 아무런 상관이 없고 Terraform에서 참조하기 위해서 이름을 할당한 것일 뿐이다. 그래서 VPC의 이름으로 표시되는 것은 tags에서 Name = "example"로 설정한 이름이 지정된다.
plan 후 apply하는 기능은 엄청 매력적인 기능이지만 주의할 점은 plan 할 때 Terraform이 실제로 적용하는 게 아니라 테스트만 해보는 것이므로 AWS의 권한 문제 등으로 튕기는 것은 미리 검증해 주지 않는다. 이때는 적절한 권한을 할당한 후에 다시 시도해야 한다. 인프라스트럭처이므로 Terraform이 웢자적으로 적용하고 롤백해 주진 않는다. 성공한 부분까지는 적용되고 실패한 부분부터 다시 적용해야 한다.
추가로 apply한 마지막 로그를 보면 State path: terraform.tfstate라고 나온 걸 볼 수 있는데 이는 적용한 인프라의 상태를 관리하는 파일로 다음과 같이 JSON으로 되어 있다. 적용된 인프라를 이 파일에서 관리하고 있으므로 Terraform으로 인프라를 관리한다면 terraform.tfstate 파일도 Git 등으로 관리하고 보관해야 한다. 이후 적용하면 terraform.tfstate.backup 파일이 하나 생기면서 마지막 버전을 하나 더 보관한다.
{
    "version": 3,
    "terraform_version": "0.8.2",
    "serial": 0,
    "lineage": "d7b033b3-03a4-4020-b389-fe8f7e95dec0",
    "modules": [
        {
            "path": [
                "root"
            ],
            "outputs": {},
            "resources": {
                "aws_security_group.example-allow-all": {
                    "type": "aws_security_group",
                    "depends_on": [
                        "aws_vpc.example"
                    ],
                    "primary": {
                        "id": "sg-d2fa7db5",
                        "attributes": {
                            "description": "Allow all inbound traffic",
                            "egress.#": "1",
                            "egress.482069346.cidr_blocks.#": "1",
                            "egress.482069346.cidr_blocks.0": "0.0.0.0/0",
                            "egress.482069346.from_port": "0",
                            "egress.482069346.prefix_list_ids.#": "0",
                            "egress.482069346.protocol": "-1",
                            "egress.482069346.security_groups.#": "0",
                            "egress.482069346.self": "false",
                            "egress.482069346.to_port": "0",
                            "id": "sg-d2fa7db5",
                            "ingress.#": "1",
                            "ingress.482069346.cidr_blocks.#": "1",
                            "ingress.482069346.cidr_blocks.0": "0.0.0.0/0",
                            "ingress.482069346.from_port": "0",
                            "ingress.482069346.protocol": "-1",
                            "ingress.482069346.security_groups.#": "0",
                            "ingress.482069346.self": "false",
                            "ingress.482069346.to_port": "0",
                            "name": "example-allow_all",
                            "owner_id": "410655858509",
                            "tags.%": "0",
                            "vpc_id": "vpc-14ff2570"
                        },
                        "meta": {},
                        "tainted": false
                    },
                    "deposed": [],
                    "provider": ""
                },
                "aws_subnet.example-a": {
                    "type": "aws_subnet",
                    "depends_on": [
                        "aws_vpc.example"
                    ],
                    "primary": {
                        "id": "subnet-4fbcdb39",
                        "attributes": {
                            "availability_zone": "ap-northeast-1a",
                            "cidr_block": "172.10.0.0/24",
                            "id": "subnet-4fbcdb39",
                            "map_public_ip_on_launch": "false",
                            "tags.%": "0",
                            "vpc_id": "vpc-14ff2570"
                        },
                        "meta": {},
                        "tainted": false
                    },
                    "deposed": [],
                    "provider": ""
                },
                "aws_subnet.example-c": {
                    "type": "aws_subnet",
                    "depends_on": [
                        "aws_vpc.example"
                    ],
                    "primary": {
                        "id": "subnet-40b81718",
                        "attributes": {
                            "availability_zone": "ap-northeast-1c",
                            "cidr_block": "172.10.1.0/24",
                            "id": "subnet-40b81718",
                            "map_public_ip_on_launch": "false",
                            "tags.%": "0",
                            "vpc_id": "vpc-14ff2570"
                        },
                        "meta": {},
                        "tainted": false
                    },
                    "deposed": [],
                    "provider": ""
                },
                "aws_vpc.example": {
                    "type": "aws_vpc",
                    "depends_on": [],
                    "primary": {
                        "id": "vpc-14ff2570",
                        "attributes": {
                            "cidr_block": "172.10.0.0/20",
                            "default_network_acl_id": "acl-2b28b94f",
                            "default_route_table_id": "rtb-ff04639b",
                            "default_security_group_id": "sg-d3fa7db4",
                            "dhcp_options_id": "dopt-a30b4bc6",
                            "enable_classiclink": "false",
                            "enable_dns_hostnames": "false",
                            "enable_dns_support": "true",
                            "id": "vpc-14ff2570",
                            "instance_tenancy": "default",
                            "main_route_table_id": "rtb-ff04639b",
                            "tags.%": "1",
                            "tags.Name": "example"
                        },
                        "meta": {},
                        "tainted": false
                    },
                    "deposed": [],
                    "provider": ""
                }
            },
            "depends_on": []
        }
    ]
}
이렇게 적용된 인프라는 terraform show 명령어로 적용된 내용을 확인해 볼 수 있다.
Key Pair 설정
EC2를 써본 사람은 알다시피 EC2 인스턴스에 SSH로 접속하기 위해 Key Pair를 만들어서 인스턴스에 지정한다. 현재 Key Pair는 Terraform으로 생성할 수는 없고 만들어진 것을 가져올 수만 있다. AWS에 이미 있는 구성을 가져오는 기능이 terraform import인데 이 명령어에서는 앞에 aws.tf로 만든 프로바이더를 사용할 수 없어서 환경변수로 Access Key, Secret Key, Region을 지정하고 사용해야 한다.
$ AWS_ACCESS_KEY_ID=YOUR-ACCESS-KEY \
> AWS_SECRET_ACCESS_KEY=YOUR-SECRET-KEY \
> AWS_DEFAULT_REGION=ap-northeast-1 \
> terraform import aws_key_pair.mykey outsider-aws

aws_key_pair.mykey: Importing from ID "outsider-aws"...
aws_key_pair.mykey: Import complete!
  Imported aws_key_pair (ID: outsider-aws)
aws_key_pair.mykey: Refreshing state... (ID: outsider-aws)

Import success! The resources imported are shown above. These are
now in your Terraform state. Import does not currently generate
configuration, so you must do this next. If you do not create configuration
for the above resources, then the next `terraform plan` will mark
them for destruction.
aws_key_pair.mykey에서 aws_key_pair은 리소스 타입이고 mykey가 내가 임의로 준 이름이다. outsider-aws가 AWS에 만들어 놓은 Key Pair의 이름이므로 outsider-aws를 가져와서 mykey라는 리소스로 임포트하는 명령어다. 실행하면 성공했다고 나오긴 하는데 여기에는 큰 문제가 있다. 마지막에 나온 메시지를 보면 Terraform state에만 적용되고 구성 파일은 만들어주지 않으므로 이 리소스에 대한 구성 파일을 만들라고 나온다. 그렇지 않으면 다음에 적용하려고 하면 해당 리소스를 지우려고 할 것이라는 메시지다.
이게 무슨 의미냐 하면 위 Key Pair가 terraform.tfstate에는 적용되었지만(실제로 열어보면 추가되었다.) .tf파일이 만들어진 것은 아니다. 그래서 적용된 것으로 기억하는 .tfstate에는 키가 있지만, 구성에는 없으므로 다음과 같이 적용하려고 하면 이 키를 지우려고 시도한다.(여기서 apply를 하면 해당 키가 지워진다. 테스트해보다가 실제로 내 키를 날려 먹었다. ㅠ)
$ terraform plan

- aws_key_pair.mykey


Plan: 0 to add, 0 to change, 1 to destroy.
그러면 import한 내용으로 구성 파일을 만들면 될 것 같지만, 문제는 또 있다. 문서를 보면 aws_key_pair의 구성이 다음과 같이 나와 있는데 여기서 public_key가 필수값이다.
resource "aws_key_pair" "deployer" {
  key_name = "deployer-key"
  public_key = "ssh-rsa AAAAB3NzaC1yc2EAAAADAQABAAABAQD3F6tyPEFEzV0LX3X8BsXdMsQz1x2cEikKDEY0aIj41qgxMCP/iteneqXSIFZBp5vizPvaoIR3Um9xK7PGoW8giupGn+EPuxIA4cDM4vzOqOkiMPhz5XK0whEjkVzTo4+S0puvDZuwIsdiW9mxhJc7tgBNL0cYlWSYVkz4G/fslNfRPW5mYAM49f4fhtxPb5ok4Q2Lg9dPKVHO/Bgeu5woMc7RY0p1ej6D4CKFE6lymSDJpW0YHX/wqE9+cfEauh7xZcG0q9t2ta6F6fmX0agvpFyZo8aFbXeUBr7osSCJNgvavWbM/06niWrOvYX2xwWdhXmXSrbX8ZbabVohBK41 email@example.com"
}
import 된 내용에도 fingerprint 정도는 있지만 보통 Key Pair를 AWS에서 만들어서 pem파일만 받으므로 퍼블릭 키를 모른다는 게 문제고 찾아낸다고 해도 그렇게 할 걸 왜 import 하는가 하는 문제에 빠진다. import 했지만 뭔가 다 수동으로 해야 하는...
실제 Key Pair는 AWS에 이미 있으므로 이름만 지정해도 상관없으므로 다음과 같이 변수로 Key Pair의 이름을 지정했다.
variable "key_pair" {
  default = "outsider-aws"
}
EC2 인스턴스 구성
이제 EC2 인스턴스를 구성해 보자. aws-ec2.tf라는 파일로 다음의 내용을 넣는다.
variable "key_pair" {
  default = "outsider-aws"
}

data "aws_ami" "ubuntu" {
  most_recent = true
  filter {
    name = "name"
    values = ["ubuntu/images/hvm-ssd/ubuntu-xenial-16.04-amd64-server-*"]
  }
  filter {
    name = "virtualization-type"
    values = ["hvm"]
  }
  owners = ["099720109477"] # Canonical
}

resource "aws_instance" "example-server" {
    ami = "${data.aws_ami.ubuntu.id}"
    instance_type = "t2.micro"
    subnet_id = "${aws_subnet.example-a.id}"
    vpc_security_group_ids = ["${aws_security_group.example-allow-all.id}"]
    key_name = "${var.key_pair}"
    count = 3
    tags {
        Name = "examples"
    }
}
여기서 처음으로 data 키워드로 데이터소스를 정의했다. 데이터소스는 프로바이더에서 값을 가져오는 기능을 하는데 aws_ami로 타입을 지정하고 Canonical에서 등록한 Ubuntu 16.04의 AMI ID를 조회해 온 것이다. 이런 식으로 최신 Amazon Linux의 AMI를 조회해서 사용한다거나 할 수 있어서 이란 값을 하드 코딩할 필요가 없다.
그 아래 aws_instance는 EC2 인스턴스를 지정한 것이다. t2.micro로 띄우고 앞에서 조회한 AMI의 ID를 사용하도록 했다. 그리고 위에서 정의한 VPC와 subnet을 사용하고 키는 선언해놓은 var.key_pair 변수를 참조하도록 했다. count=3이므로 서버는 3대가 띄우겠다는 의미이다.
이제 plan을 먼저 실행해보자.(로그가 길지만 참고삼아 전체를 다 붙여넣었다.)
$ terraform plan
Refreshing Terraform state in-memory prior to plan...
The refreshed state will be used to calculate this plan, but
will not be persisted to local or remote state storage.

aws_vpc.example: Refreshing state... (ID: vpc-14ff2570)
data.aws_ami.ubuntu: Refreshing state...
aws_subnet.example-a: Refreshing state... (ID: subnet-4fbcdb39)
aws_subnet.example-c: Refreshing state... (ID: subnet-40b81718)
aws_security_group.example-allow-all: Refreshing state... (ID: sg-d2fa7db5)

The Terraform execution plan has been generated and is shown below.
Resources are shown in alphabetical order for quick scanning. Green resources
will be created (or destroyed and then created if an existing resource
exists), yellow resources are being changed in-place, and red resources
will be destroyed. Cyan entries are data sources to be read.

Note: You didn't specify an "-out" parameter to save this plan, so when
"apply" is called, Terraform can't guarantee this is what will execute.

+ aws_instance.example-server.0
    ami:                               "ami-18afc47f"
    associate_public_ip_address:       "<computed>"
    availability_zone:                 "<computed>"
    ebs_block_device.#:                "<computed>"
    ephemeral_block_device.#:          "<computed>"
    instance_state:                    "<computed>"
    instance_type:                     "t2.micro"
    key_name:                          "outsider-aws"
    network_interface_id:              "<computed>"
    placement_group:                   "<computed>"
    private_dns:                       "<computed>"
    private_ip:                        "<computed>"
    public_dns:                        "<computed>"
    public_ip:                         "<computed>"
    root_block_device.#:               "<computed>"
    security_groups.#:                 "<computed>"
    source_dest_check:                 "true"
    subnet_id:                         "subnet-4fbcdb39"
    tags.%:                            "1"
    tags.Name:                         "examples"
    tenancy:                           "<computed>"
    vpc_security_group_ids.#:          "1"
    vpc_security_group_ids.2117745025: "sg-d2fa7db5"

+ aws_instance.example-server.1
    ami:                               "ami-18afc47f"
    associate_public_ip_address:       "<computed>"
    availability_zone:                 "<computed>"
    ebs_block_device.#:                "<computed>"
    ephemeral_block_device.#:          "<computed>"
    instance_state:                    "<computed>"
    instance_type:                     "t2.micro"
    key_name:                          "outsider-aws"
    network_interface_id:              "<computed>"
    placement_group:                   "<computed>"
    private_dns:                       "<computed>"
    private_ip:                        "<computed>"
    public_dns:                        "<computed>"
    public_ip:                         "<computed>"
    root_block_device.#:               "<computed>"
    security_groups.#:                 "<computed>"
    source_dest_check:                 "true"
    subnet_id:                         "subnet-4fbcdb39"
    tags.%:                            "1"
    tags.Name:                         "examples"
    tenancy:                           "<computed>"
    vpc_security_group_ids.#:          "1"
    vpc_security_group_ids.2117745025: "sg-d2fa7db5"

+ aws_instance.example-server.2
    ami:                               "ami-18afc47f"
    associate_public_ip_address:       "<computed>"
    availability_zone:                 "<computed>"
    ebs_block_device.#:                "<computed>"
    ephemeral_block_device.#:          "<computed>"
    instance_state:                    "<computed>"
    instance_type:                     "t2.micro"
    key_name:                          "outsider-aws"
    network_interface_id:              "<computed>"
    placement_group:                   "<computed>"
    private_dns:                       "<computed>"
    private_ip:                        "<computed>"
    public_dns:                        "<computed>"
    public_ip:                         "<computed>"
    root_block_device.#:               "<computed>"
    security_groups.#:                 "<computed>"
    source_dest_check:                 "true"
    subnet_id:                         "subnet-4fbcdb39"
    tags.%:                            "1"
    tags.Name:                         "examples"
    tenancy:                           "<computed>"
    vpc_security_group_ids.#:          "1"
    vpc_security_group_ids.2117745025: "sg-d2fa7db5"


Plan: 3 to add, 0 to change, 0 to destroy.
EC2 인스턴스 3대가 잘 표시되었으므로 이제 실제로 적용해보자.
terraform apply
aws_vpc.example: Refreshing state... (ID: vpc-14ff2570)
data.aws_ami.ubuntu: Refreshing state...
aws_subnet.example-c: Refreshing state... (ID: subnet-40b81718)
aws_security_group.example-allow-all: Refreshing state... (ID: sg-d2fa7db5)
aws_subnet.example-a: Refreshing state... (ID: subnet-4fbcdb39)
aws_instance.example-server.1: Creating...
  ami:                               "" => "ami-18afc47f"
  associate_public_ip_address:       "" => "<computed>"
  availability_zone:                 "" => "<computed>"
  ebs_block_device.#:                "" => "<computed>"
  ephemeral_block_device.#:          "" => "<computed>"
  instance_state:                    "" => "<computed>"
  instance_type:                     "" => "t2.micro"
  key_name:                          "" => "outsider-aws"
  network_interface_id:              "" => "<computed>"
  placement_group:                   "" => "<computed>"
  private_dns:                       "" => "<computed>"
  private_ip:                        "" => "<computed>"
  public_dns:                        "" => "<computed>"
  public_ip:                         "" => "<computed>"
  root_block_device.#:               "" => "<computed>"
  security_groups.#:                 "" => "<computed>"
  source_dest_check:                 "" => "true"
  subnet_id:                         "" => "subnet-4fbcdb39"
  tags.%:                            "" => "1"
  tags.Name:                         "" => "examples"
  tenancy:                           "" => "<computed>"
  vpc_security_group_ids.#:          "" => "1"
  vpc_security_group_ids.2117745025: "" => "sg-d2fa7db5"
aws_instance.example-server.0: Creating...
  ami:                               "" => "ami-18afc47f"
  associate_public_ip_address:       "" => "<computed>"
  availability_zone:                 "" => "<computed>"
  ebs_block_device.#:                "" => "<computed>"
  ephemeral_block_device.#:          "" => "<computed>"
  instance_state:                    "" => "<computed>"
  instance_type:                     "" => "t2.micro"
  key_name:                          "" => "outsider-aws"
  network_interface_id:              "" => "<computed>"
  placement_group:                   "" => "<computed>"
  private_dns:                       "" => "<computed>"
  private_ip:                        "" => "<computed>"
  public_dns:                        "" => "<computed>"
  public_ip:                         "" => "<computed>"
  root_block_device.#:               "" => "<computed>"
  security_groups.#:                 "" => "<computed>"
  source_dest_check:                 "" => "true"
  subnet_id:                         "" => "subnet-4fbcdb39"
  tags.%:                            "" => "1"
  tags.Name:                         "" => "examples"
  tenancy:                           "" => "<computed>"
  vpc_security_group_ids.#:          "" => "1"
  vpc_security_group_ids.2117745025: "" => "sg-d2fa7db5"
aws_instance.example-server.2: Creating...
  ami:                               "" => "ami-18afc47f"
  associate_public_ip_address:       "" => "<computed>"
  availability_zone:                 "" => "<computed>"
  ebs_block_device.#:                "" => "<computed>"
  ephemeral_block_device.#:          "" => "<computed>"
  instance_state:                    "" => "<computed>"
  instance_type:                     "" => "t2.micro"
  key_name:                          "" => "outsider-aws"
  network_interface_id:              "" => "<computed>"
  placement_group:                   "" => "<computed>"
  private_dns:                       "" => "<computed>"
  private_ip:                        "" => "<computed>"
  public_dns:                        "" => "<computed>"
  public_ip:                         "" => "<computed>"
  root_block_device.#:               "" => "<computed>"
  security_groups.#:                 "" => "<computed>"
  source_dest_check:                 "" => "true"
  subnet_id:                         "" => "subnet-4fbcdb39"
  tags.%:                            "" => "1"
  tags.Name:                         "" => "examples"
  tenancy:                           "" => "<computed>"
  vpc_security_group_ids.#:          "" => "1"
  vpc_security_group_ids.2117745025: "" => "sg-d2fa7db5"
aws_instance.example-server.1: Still creating... (10s elapsed)
aws_instance.example-server.2: Still creating... (10s elapsed)
aws_instance.example-server.0: Still creating... (10s elapsed)
aws_instance.example-server.1: Still creating... (20s elapsed)
aws_instance.example-server.2: Still creating... (20s elapsed)
aws_instance.example-server.0: Still creating... (20s elapsed)
aws_instance.example-server.1: Creation complete
aws_instance.example-server.2: Creation complete
aws_instance.example-server.0: Creation complete

Apply complete! Resources: 3 added, 0 changed, 0 destroyed.

The state of your infrastructure has been saved to the path
below. This state is required to modify and destroy your
infrastructure, so keep it safe. To inspect the complete state
use the `terraform show` command.

State path: terraform.tfstate
EC2 인스턴스가 떠야 하므로 시간이 좀 걸린다.

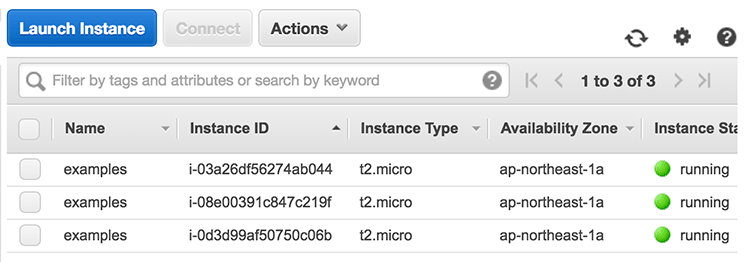
AWS 웹 콘솔에 가면 3대가 잘 뜬 걸 볼 수 있다.
이런 식으로 필요한 리소스를 관리하고 설정을 변경하면서 관리하면 인프라를 모두 코드로 관리할 수 있다. 이게 HashiCorp의 도에서 설명하는 Codification이라고 할 수 있다. 실제로 제대로 사용은 아직 못 해봤지만 인프라는 금세 관리범위 밖에서 방치되는 경우가 많아서(특히 security group 같은 건 잘 지우게 되지 않는다.) 코드로 관리해놓으면 왜 바꾼 지까지도 추적할 수 있을 거라고 생각해서 이 접근에 관심이 많은 편이다.
리소스 그래프
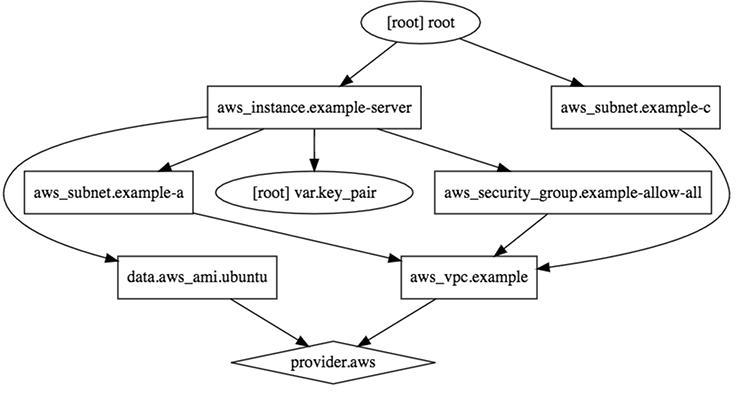
terraform graph 명령어를 사용하면 설정한 리소스의 의존성 그래프를 그릴 수 있다.
$ terraform graph
digraph {
  compound = "true"
  newrank = "true"
  subgraph "root" {
    "[root] aws_instance.example-server" [label = "aws_instance.example-server", shape = "box"]
    "[root] aws_security_group.example-allow-all" [label = "aws_security_group.example-allow-all", shape = "box"]
    "[root] aws_subnet.example-a" [label = "aws_subnet.example-a", shape = "box"]
    "[root] aws_subnet.example-c" [label = "aws_subnet.example-c", shape = "box"]
    "[root] aws_vpc.example" [label = "aws_vpc.example", shape = "box"]
    "[root] data.aws_ami.ubuntu" [label = "data.aws_ami.ubuntu", shape = "box"]
    "[root] provider.aws" [label = "provider.aws", shape = "diamond"]
    "[root] aws_instance.example-server" -> "[root] aws_security_group.example-allow-all"
    "[root] aws_instance.example-server" -> "[root] aws_subnet.example-a"
    "[root] aws_instance.example-server" -> "[root] data.aws_ami.ubuntu"
    "[root] aws_instance.example-server" -> "[root] var.key_pair"
    "[root] aws_security_group.example-allow-all" -> "[root] aws_vpc.example"
    "[root] aws_subnet.example-a" -> "[root] aws_vpc.example"
    "[root] aws_subnet.example-c" -> "[root] aws_vpc.example"
    "[root] aws_vpc.example" -> "[root] provider.aws"
    "[root] data.aws_ami.ubuntu" -> "[root] provider.aws"
    "[root] root" -> "[root] aws_instance.example-server"
    "[root] root" -> "[root] aws_subnet.example-c"
  }
}
이 형식은 GraphViz 형식이므로 GraphViz를 보여주는 사이트에서 위 내용을 넣으면 의존성 그래프를 그려준다.

인프라 삭제
이 글에서는 테스트라서 그렇지 실제로 운영할 때는 전체 인프라를 삭제할 일은 없을 거라고 생각하지만, 삭제 기능도 제공한다. 실제 사용할 때는 아마 일부 구성을 지우고 적용하는 접근을 할 것이다.
terraform plan -destroy처럼 plan에 -destroy 옵션을 제공하면 전체 삭제에 대한 플랜을 볼 수 있다.
$ terraform plan -destroy
Refreshing Terraform state in-memory prior to plan...
The refreshed state will be used to calculate this plan, but
will not be persisted to local or remote state storage.

aws_vpc.example: Refreshing state... (ID: vpc-14ff2570)
data.aws_ami.ubuntu: Refreshing state...
aws_subnet.example-a: Refreshing state... (ID: subnet-4fbcdb39)
aws_subnet.example-c: Refreshing state... (ID: subnet-40b81718)
aws_security_group.example-allow-all: Refreshing state... (ID: sg-d2fa7db5)
aws_instance.example-server.1: Refreshing state... (ID: i-0d3d99af50750c06b)
aws_instance.example-server.0: Refreshing state... (ID: i-08e00391c847c219f)
aws_instance.example-server.2: Refreshing state... (ID: i-03a26df56274ab044)

The Terraform execution plan has been generated and is shown below.
Resources are shown in alphabetical order for quick scanning. Green resources
will be created (or destroyed and then created if an existing resource
exists), yellow resources are being changed in-place, and red resources
will be destroyed. Cyan entries are data sources to be read.

Note: You didn't specify an "-out" parameter to save this plan, so when
"apply" is called, Terraform can't guarantee this is what will execute.

- aws_instance.example-server.0

- aws_instance.example-server.1

- aws_instance.example-server.2

- aws_security_group.example-allow-all

- aws_subnet.example-a

- aws_subnet.example-c

- aws_vpc.example

- data.aws_ami.ubuntu


Plan: 0 to add, 0 to change, 7 to destroy.
모두 지워지는 것을 확인했으므로 이제 terraform destroy를 실행하면 여기서 설정한 모든 구성이 제거된다.
$ terraform destroy
Do you really want to destroy?
  Terraform will delete all your managed infrastructure.
  There is no undo. Only 'yes' will be accepted to confirm.

  Enter a value: ㅛyes

aws_vpc.example: Refreshing state... (ID: vpc-14ff2570)
data.aws_ami.ubuntu: Refreshing state...
aws_subnet.example-a: Refreshing state... (ID: subnet-4fbcdb39)
aws_subnet.example-c: Refreshing state... (ID: subnet-40b81718)
aws_security_group.example-allow-all: Refreshing state... (ID: sg-d2fa7db5)
aws_instance.example-server.0: Refreshing state... (ID: i-08e00391c847c219f)
aws_instance.example-server.2: Refreshing state... (ID: i-03a26df56274ab044)
aws_instance.example-server.1: Refreshing state... (ID: i-0d3d99af50750c06b)
aws_subnet.example-c: Destroying...
aws_instance.example-server.2: Destroying...
aws_instance.example-server.0: Destroying...
aws_instance.example-server.1: Destroying...
aws_subnet.example-c: Destruction complete
aws_instance.example-server.0: Still destroying... (10s elapsed)
aws_instance.example-server.2: Still destroying... (10s elapsed)
aws_instance.example-server.1: Still destroying... (10s elapsed)
aws_instance.example-server.2: Still destroying... (20s elapsed)
aws_instance.example-server.0: Still destroying... (20s elapsed)
aws_instance.example-server.1: Still destroying... (20s elapsed)
aws_instance.example-server.2: Still destroying... (30s elapsed)
aws_instance.example-server.0: Still destroying... (30s elapsed)
aws_instance.example-server.1: Still destroying... (30s elapsed)
aws_instance.example-server.2: Still destroying... (40s elapsed)
aws_instance.example-server.0: Still destroying... (40s elapsed)
aws_instance.example-server.1: Still destroying... (40s elapsed)
aws_instance.example-server.1: Still destroying... (50s elapsed)
aws_instance.example-server.2: Still destroying... (50s elapsed)
aws_instance.example-server.0: Still destroying... (50s elapsed)
aws_instance.example-server.2: Destruction complete
aws_instance.example-server.1: Destruction complete
aws_instance.example-server.0: Still destroying... (1m0s elapsed)
aws_instance.example-server.0: Destruction complete
aws_security_group.example-allow-all: Destroying...
aws_subnet.example-a: Destroying...
aws_subnet.example-a: Destruction complete
aws_security_group.example-allow-all: Destruction complete
aws_vpc.example: Destroying...
aws_vpc.example: Destruction complete

Destroy complete! Resources: 7 destroyed.


Comments